Working with USB Devices
Anka can give a physical USB device on the host to a VM. The procedure is different on Intel and on Apple silicon hosts.
| Intel | Apple silicon | |
|---|---|---|
| How you attach a device | anka usb claim and anka attach | The macOS Virtual Machine Accessories menu |
| iPhones | Supported | Not supported |
| Webcams, USB audio devices, and headsets | Not tested | Not supported |
| Android devices | Not tested | Disconnect and connect again (FB25252156) |
| Start a VM with a USB device from the Controller API | Supported | Not supported |
USB passthrough requires an Anka Flow, Anka Build Enterprise, Anka Build Enterprise Plus, or Anka Secure license.
Apple silicon
On Apple silicon, macOS controls which app gets a USB device. You give the device to the VM in the Virtual Machine Accessories menu, in the macOS menu bar. The anka usb claim, anka usb release, and anka attach commands do not attach devices on Apple silicon.
Requirements:
- The host must have macOS 27 or later and Anka 3.10.0 or later.
- The VM must have macOS 27.0.1 or later.
Devices that are not supported
macOS does not let a VM capture a USB device that has isochronous endpoints, even when the device does not use them. This includes:
- iPhones. An iPhone has an isochronous endpoint in its audio configuration.
- Most webcams, USB audio devices, and headsets.
When you select one of these devices in the Virtual Machine Accessories menu, the VM does not get the device. The VM log shows
A USB passthrough device with isochronous endpoints is not supported.Android devices disconnect and connect again
Some Android devices disconnect from the VM and connect again approximately one time each second. We saw this with a Samsung phone. The VM gets the device, but the device does not stay connected long enough to use it. This is a macOS issue, and we reported it to Apple as FB25252156.
Attach a USB device to a VM
Connect the USB device to the host.
Start the VM:
anka start -v 27.0.1In the menu bar, click the Virtual Machine Accessories icon. Select the device, then choose Use with followed by the name of the app that started the VM. For example, if you started the VM from iTerm2, choose Use with iTerm2.
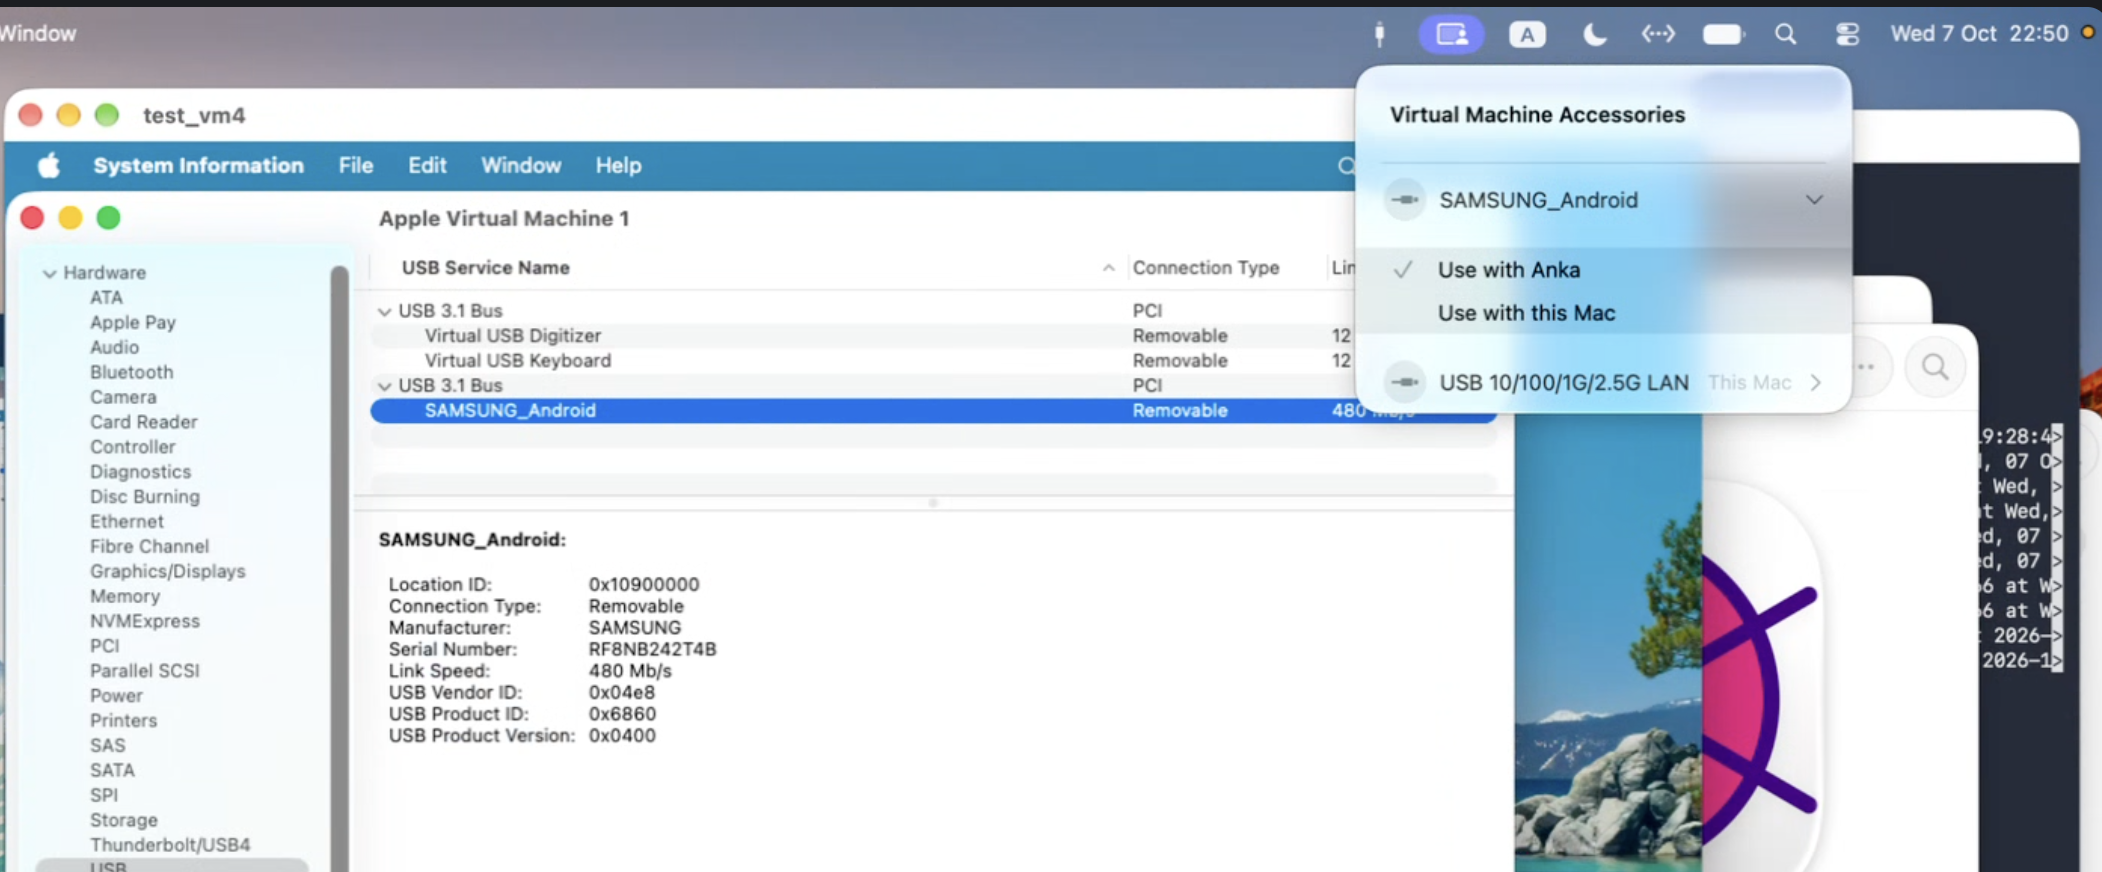
Make sure that the VM has the device. In the VM, open System Information and select USB. The device shows under a
USB 3.1 Bus. You can also do this from the host:anka run 27.0.1 system_profiler SPUSBDataType
Give the USB device back to the host
In the Virtual Machine Accessories menu, select the device and choose Use with this Mac. The device leaves the VM.
macOS remembers which app has the device. If you disconnect the device and connect it again, macOS gives it to the VM again. Choose Use with this Mac to stop this.
Intel
Using the Anka CLI to claim USB devices on a host machine
When connecting to the host, DO NOT trust the device (only trust when attaching to the VM). If you’ve already trusted the device on your host in the past, you’ll need to Reset Network Settings on the device:
Settings -> General -> Reset -> Reset Network Settings.
List USB devices and find your device and note the name, vendor_id, and location.
❯ sudo anka usb list
+------------------------------------+--------------------------+------------+---------+------------+
| name                               | vendor_id                | location   | is_busy | claim_name |
+------------------------------------+--------------------------+------------+---------+------------+
| Ambient Light Sensor               | 05ac:826                 | 2150629376 | No      |            |
+------------------------------------+--------------------------+------------+---------+------------+
| Apple Internal Keyboard / Trackpad | FM7009501FNHYYKAV+WD     | 2152726528 | No      |            |
+------------------------------------+--------------------------+------------+---------+------------+
| Apple T2 Controller                | 05ac:823                 | 2148532224 | No      |            |
+------------------------------------+--------------------------+------------+---------+------------+
| Device in Port 8                   | 05ac:810                 | 2155872256 | No      |            |
+------------------------------------+--------------------------+------------+---------+------------+
| FaceTime HD Camera (Built-in)      | CC2949500PVHNW11         | 2149580800 | No      |            |
+------------------------------------+--------------------------+------------+---------+------------+
| Headset                            | 05ac:810                 | 2151677952 | No      |            |
+------------------------------------+--------------------------+------------+---------+------------+
| Touch Bar Backlight                | 05ac:810                 | 2154823680 | No      |            |
+------------------------------------+--------------------------+------------+---------+------------+
| Touch Bar Display                  | 05ac:830                 | 2153775104 | No      |            |
+------------------------------------+--------------------------+------------+---------+------------+
| iPhone                             | 00008120-001A45813E9B401 | 337641472  | Yes     |            |
+------------------------------------+--------------------------+------------+---------+------------+
You can now claim the device using the name, vendor_id, or location and optionally add it to a claim name group:
anka usb claim iPhone
If you have more than one iPhone, using a claim name (--claim-name) to group them is usually good practice. This allows you to specifyiphoneswhen starting a VM. Be aware: If you’ve assigned multiple devices to the claim name, the VM will nondeterministically choose a non-busy device.
Confirm that it’s claimed:
❯ sudo anka usb claim -n test 00008120-001A45813E9B401
anka: test: device not found

❯ sudo anka usb list
+------------------------------------+--------------------------+------------+---------+--------------+
| name                               | vendor_id                | location   | is_busy | claim_name   |
+------------------------------------+--------------------------+------------+---------+--------------+
| Ambient Light Sensor               | 05ac:826                 | 2150629376 | No      |              |
+------------------------------------+--------------------------+------------+---------+--------------+
| Apple Internal Keyboard / Trackpad | FM7009501FNHYYKAV+WD     | 2152726528 | No      |              |
+------------------------------------+--------------------------+------------+---------+--------------+
| Apple T2 Controller                | 05ac:823                 | 2148532224 | No      |              |
+------------------------------------+--------------------------+------------+---------+--------------+
| Device in Port 8                   | 05ac:810                 | 2155872256 | No      |              |
+------------------------------------+--------------------------+------------+---------+--------------+
| FaceTime HD Camera (Built-in)      | CC2949500PVHNW11         | 2149580800 | No      |              |
+------------------------------------+--------------------------+------------+---------+--------------+
| Headset                            | 05ac:810                 | 2151677952 | No      |              |
+------------------------------------+--------------------------+------------+---------+--------------+
| Touch Bar Backlight                | 05ac:810                 | 2154823680 | No      |              |
+------------------------------------+--------------------------+------------+---------+--------------+
| Touch Bar Display                  | 05ac:830                 | 2153775104 | No      |              |
+------------------------------------+--------------------------+------------+---------+--------------+
| iPhone                             | 00008120-001A45813E9B401 | 337641472  | No      | iPhone       |
+------------------------------------+--------------------------+------------+---------+--------------+
Now attach the device to a VM using the name, vendor_id, location, or claim_name (we’ll use the claim name):
sh-3.2# anka start 14.4
sh-3.2# anka attach 14.4 iPhone
Confirm that the device is available within the VM:
❯ anka run 14.4 system_profiler SPUSBDataType
USB:

    USB 3.0 Bus:

      Host Controller Driver: AppleUSBXHCIPPT
      PCI Device ID: 0x1e31
      PCI Revision ID: 0x0000
      PCI Vendor ID: 0x8086

        iPhone:

          Product ID: 0x12a8
          Vendor ID: 0x05ac (Apple Inc.)
          Version: 15.02
          Serial Number: 00008120001A45813E9B401E
          Speed: Up to 480 Mb/s
          Manufacturer: Apple Inc.
          Location ID: 0x07e00000 / 6
          Current Available (mA): 500
          Current Required (mA): 500
          Extra Operating Current (mA): 0
Using the Controller API (Requires Enterprise or higher license)
Perform steps outlined above to claim USB devices on the host machine.
You can now request the USB device list from the Controller REST API. The
bodyobject will contain an unordered list of vendor_id OR claim group names.anka usb claim 275a5e5f1313b22305c9beaffc4d58d985ebxxxx device claimed successfully curl https://127.0.0.1/api/v1/usb {"status":"OK","message":"","body":{"275a5e5f1313b22305c9beaffc4d58d985ebxxxx":{"busy":0,"available":1}}} anka usb release 275a5e5f1313b22305c9beaffc4d58d985ebxxxx device released successfully anka usb claim --claim-name iphones 275a5e5f1313b22305c9beaffc4d58d985ebxxxx device claimed successfully curl https://127.0.0.1/api/v1/usb {"status":"OK","message":"","body":{"iphones":{"busy":0,"available":1}}}Finally, start a VM using
/api/v1/vmand set the usb_device to the device name or claim name (support for vendor_id is pending):curl -X POST -H "Content-Type: application/json" https://127.0.0.1/api/v1/vm \ -d '{"vmid": "e56b4aaf-0797-42dd-9ebe-41908bf10a4d", "tag": "clean", "usb_device": "iphones"}' | jq { "status": "OK", "message": "", "body": [ "43189649-99e3-458e-47ae-ce40fab2b676" ] }If certificate based authentication is enabled, you need to include the –cert, –key, and –cacert:
curl https://127.0.0.1/api/v1/usb --cert ~/node-crt.pem --key ~/node-key.pem --cacert ~/anka-ca-crt.pem
{"status":"OK","message":"","body":{"275a5e5f1313b22305c9beaffc4d58d985ebxxxx":{"busy":0,"available":1}}}
Finally, confirm the Instance was created and started on your Controller Instances page.
You might see a delay in receiving a Trust prompt on your device after starting the VM.