UAK / TAP Authentication
Important
- This feature requires either
EnterpriseorEnterprise Plus. There are several license specific differences that should be noted before you begin:
- Enterprise: By default, any secrets you generate and use (root or user) always have full access to the API.
- Enterprise Plus: By default, only the root token (RTA) has full access to the API. User tokens must be created with a group attached and permissions added for the group.
- Your Nodes will lose connection until you join them using the new credential.
Starting in 1.19.0 of the Anka Build Cloud, you can generate a UAK which is then used to request a temporary auth session and token for a client. These session tokens allow access to the API to perform various tasks.
How to configure
Follow the same instruction from the above root token section, but also include
ANKA_ENABLE_API_KEYSset totrue.Use the Controller’s User API Keys UI panel or API to generate a user key for the controller and also the registry. KEEP THESE SECRET.
- You can now use the key and ID to communicate with the Controller and/or Registry through the
ankacluster joincommand,anka registry(only Anka version 3.1 or higher), or in your client (through a TAP session/token) to the APIs.
Each UAK can have one or more TAP generated sessions. This means you can generate a single UAK for a single piece of software which is deployed multiple times, and each software instance will get its own TAP generated session, independent from the others, but using the same key. An example of this is having a single UAK for all of your Anka Nodes to use when joining.
Joining Nodes
Once you have the UAK key generated from Step 2 (above), you can use it to join the Anka Node.
❯ sudo ankacluster join http://anka.controller:8090 --groups "gitlab-test-group-env" --reserve-space 10GB --api-key-id "nathan" --api-key-string "$ANKA_API_KEY_STRING"
I0920 15:31:15.008778   77147 factory.go:75] Default http client using API Key authentication
Testing connection to the controller...: Ok
Testing connection to the registry...: Ok
Success!
I0920 15:31:37.300568   77147 factory.go:75] Default http client using API Key authentication
Anka Cloud Cluster join success
At the moment the ankacluster command does not support ENVs.Instead of passing the private key as a string (--api-key-string), you can specify the path to the key file with--api-key-file.
Token Authentication Protocol (TAP)
This communication protocol is for user authentication using asymmetric encryption. You’ll use this if you plan on making calls using an Authorization: bearer header to the API. The API is separate from the usual /api/v1/.
- OpenSSL >= 3.x is required (macOS defaults to 2.x). The example below will install openssl 3 with brew and set it in the PATH ENV.
- We highly recommended enabling HTTPS.
- Base64 uses safe url encoding.
- Key length is 2048, Hashing algorithm SHA256, OAEP padding.
- Private key format is PEM PKCS#1.
- Public key format is PKIX, ASN.1 DER.
How it works
- You’ve generated a UAK and it’s stored on the Controller and/or Registry with some unique identifier.
- Your client sends the first phase of the authentication:
POST /tap/v1/hand -d '{"id": "<API-KEY-USER-ID>" }'(doesn’t need auth to communicate with). - The server generates a random string, encrypts it with the client’s public key that it has stored, encodes it in base64, and passes it back to the requesting client in the response body.
- Your client then decodes and decrypts the response using the UAK private key it has available locally, and then sends the second phase of the authentication with the decoded string as
SECRET-STRING:POST /tap/v1/shake -d '{"id": "<API-KEY-USER-ID>", "secret": "<SECRET-STRING>" }'
By default, the secret is valid for 3 minutes. Also, you can only call /tap/v1/shake once for a secret after which it will become invalid.
The server then successfully authenticates the client and returns the following object (base64 encoded) in the response body:
{ "id": <API-KEY-USER-ID>, "data": <GENERIC-OBJECT> }You then take the contents of
datain the response, base64 it, and use it in your Authorization: Bearer header for API calls.
The data object should look like
{
  "userName": <USER-IDENTIFIER>
  "sessionId": <SESSION-ID>
  "token": <SESSION-TOKEN>
}
An example of the entire flow using BASH and CURL:
❯ brew install openssl
❯ export PATH="$(brew --prefix)/opt/openssl/bin:$PATH"

❯ ls nathan-*pem
nathan-key.pem nathan-pub.pem

❯ echo -n $(curl -s http://anka.controller:8090/tap/v1/hand -d '{"id": "nathan"}') | base64 -d > to_decrypt

# You have 10 seconds after obtaining the /hand token to shake. Otherwise, you will see an error thrown due to expiration.

❯ openssl pkeyutl -decrypt -inkey nathan-key.pem -in to_decrypt -out decrypted -pkeyopt rsa_padding_mode:oaep -pkeyopt rsa_oaep_md:sha256

❯ cat decrypted
59A8Zb8XxtsBNpJ-1KYFKOzQfv8

❯ curl -s http://anka.controller:8090/tap/v1/shake -d "{\"id\": \"nathan\", \"secret\": \"$(cat decrypted)\" }"
{"id":"nathan","data":{"userName":"nathan","token":"XtACTPdOC_vF03s75EWSGunMGCDiU2aBIe97Pai0ruRDjhNpPZqg2w","sessionId":"34c06a2b-141a-434a-5313-a06788f20957"}}

❯ echo '{"id":"nathan","data":{"userName":"nathan","token":"6Z8JVhdo8MNUUHmFVy0bgjoSuiVJAsNYsqTdpqklqYv7j7xlJo6c2w","sessionId":"6dc7bd5e-a4b4-4c99-4b2e-c299fc101dc0"}}' | jq -r '.data' | base64
ewogICJ1c2VyTmFtZSI6ICJuYXRoYW4iLAogICJ0b2tlbiI6ICI2WjhKVmhkbzhNTlVVSG1GVnkwYmdqb1N1aVZKQXNOWXNxVGRwcWtscVl2N2o3eGxKbzZjMnciLAogICJzZXNzaW9uSWQiOiAiNmRjN2JkNWUtYTRiNC00Yzk5LTRiMmUtYzI5OWZjMTAxZGMwIgp9Cg==

❯ curl -s http://anka.controller:8090/api/v1/status
{"status":"FAIL","message":"Authentication Required"}

❯ curl -sH "Authorization: Bearer ewogICJ1c2VyTmFtZSI6ICJuYXRoYW4iLAogICJ0b2tlbiI6ICI2WjhKVmhkbzhNTlVVSG1GVnkwYmdqb1N1aVZKQXNOWXNxVGRwcWtscVl2N2o3eGxKbzZjMnciLAogICJzZXNzaW9uSWQiOiAiNmRjN2JkNWUtYTRiNC00Yzk5LTRiMmUtYzI5OWZjMTAxZGMwIgp9Cg==" http://anka.controller:8090/api/v1/status
{"status":"OK","message":"","body":{"status":"Running","version":"1.25.0-b2a027a4","registry_address":"http://anka.registry:8089","registry_status":"Running","license":"enterprise plus"}}
You have 10 seconds after obtaining the /hand token to shake. Otherwise, you will see an error thrown due to expiration.
By default, the TTL for keys is 5 minutes. You can modify this with the ANKA_API_KEYS_SESSION_TTL, set in the Controller and Registry configs. The TTL however will not cause long running requests, like downloads, to be interrupted.Managing User/Group Permissions (Authorization)
Important
- You can set groups for each api key or use the API Key ID as the “username” and create individual permissions for them.
- Note for Enterprise Plus customers using OpenID and UAK: Typically, Authorization is enabled with the
ANKA_ENABLE_CONTROLLER_AUTHORIZATIONand other similar ENVs. However, when using your Ent+ license with OpenID and UAK, you will always need to add permissions for the groups claim you set in your OpenID configuration. Otherwise, you’ll see a blank Controller UI and API requests will fail.
Authorization allows you to control access to specific actions/endpoints of the API and even specific Resources like Nodes and Templates in your Controller and Registry. It has four parts to it that are important to understand:
- Component (Controller or Registry)
- Groups
- Permissions
- Resources
- Permissions
- Groups
Groups are the wrappers for all Permissions and Resources. You attach a Groups to a Authentication credential to enable certain access.
- Group Permissions are given to allow a credential access to perform a specific action, like listing or creating a VM Instances. Because these control general access to the API to make calls, it overrides any Resource Permissions.
Resources limit which Nodes and Templates the credential can control.
- Resource Permissions are given to a Resource, further limiting the Group’s access per Resource. As an example, these Resource Permissions allow an admin to prevent a specific Group from deleting a Node from the cloud, yet allow changes to its config, and more. It’s critical to understand that if the Groups Permission “Instances > Start” is not checked, the Resource Permissions for the Group allowing Create Instance won’t matter as the credential has no access to make a Start VM API call.
- Resource Management, which enables Resource control, is optional. If disabled, all Resources (and Resource Permissions) are available to all credentials.
After a Group is created, you’ll assign it to a specific credential. The credential can have one or more Groups attached and it’s important you consider how much access for each Group you need to provide for your use-case and security requirements.
In this guide we will start with the most common use-case of sharing Node between multiple teams (Groups), then explain how to isolate Nodes per team (similar to how the older Node Groups worked) later on.
Prerequisites
To enable Authorization features, you’ll need to ensure:
Authentication is enabled by setting
ANKA_ENABLE_AUTHandANKA_ROOT_TOKENENVs in your Controller & Registry config. You’re also familiar with one of the existing Authentication methods and have one set up.Groups + Group Permissions are enabled by enabling Authorization. The following ENVs can be added to your config to achieve this:
ANKA_ENABLE_CONTROLLER_AUTHORIZATION(boolean) works for both macOS and docker controller packages.ANKA_ENABLE_REGISTRY_AUTHORIZATION(boolean) works for the macOS registry package only.ANKA_ENABLE_AUTHORIZATION(boolean) is only for the registry.
This should expose the
https://<controller address>/#/permission-groupspage in your Controller.Resource Permissions are enabled by setting
ANKA_ENABLE_RESOURCE_MANAGEMENTtotruein your configuration.
License Considerations: These features are only available for Enterprise tier licenses.
- Enterprise license customers cannot control authorization and each authentication credential will have full access to the system.
- However, Enterprise Plus customers will be able to use Permission Groups and Resources to have more fine-grained control over access.
Groups + Group Permissions
Do not confuse Node Groups with Groups/Group Permissions.
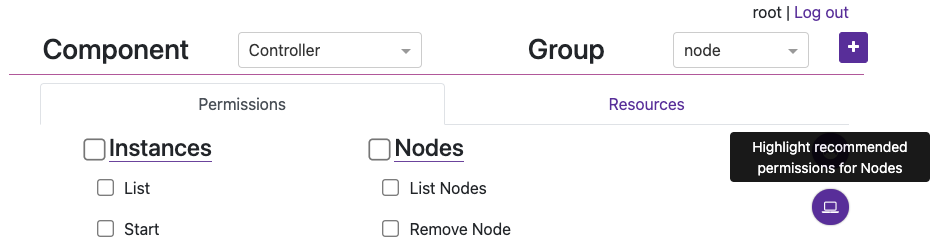
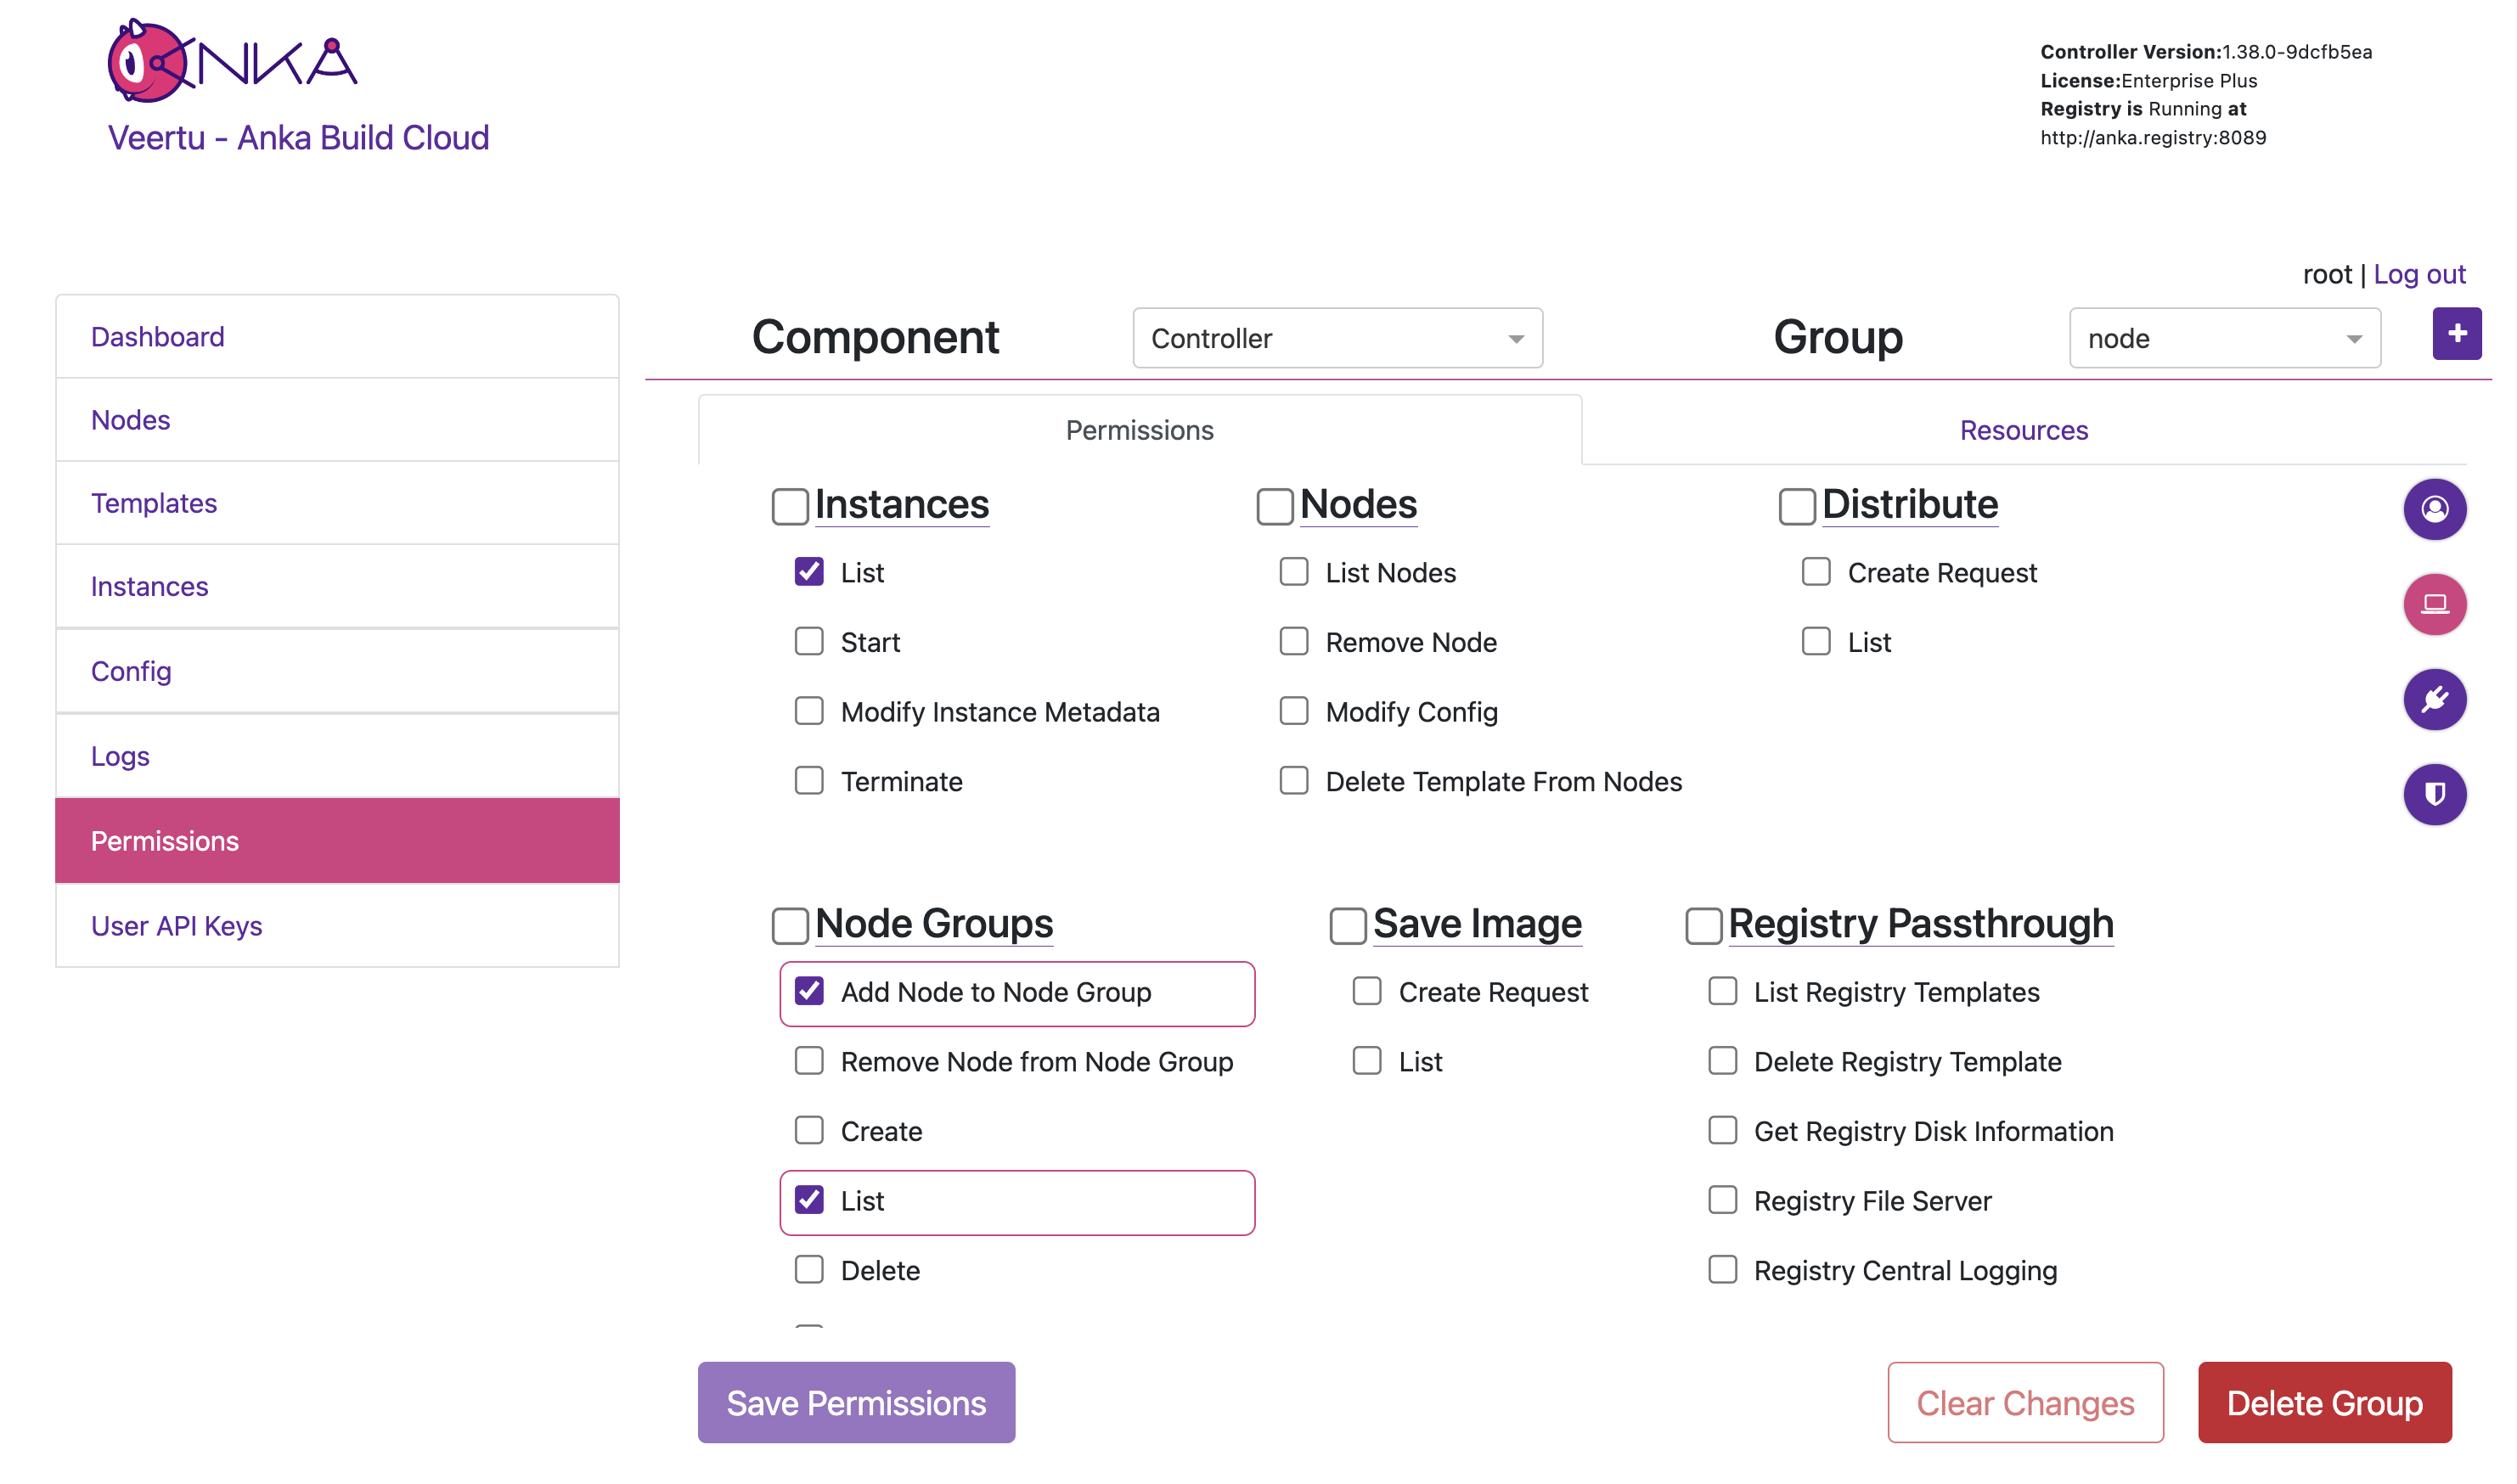
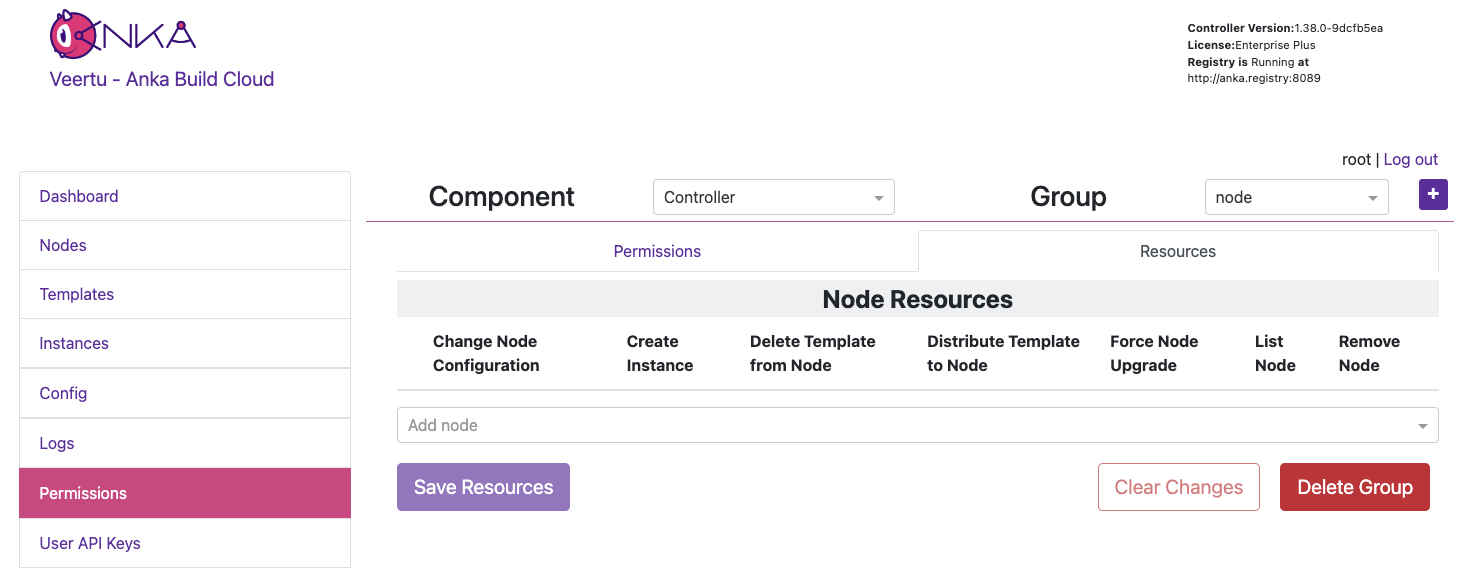
Under the Permissions section of the Controller UI (https://<controller address>/#/permission-groups), let’s create a group for our nodes to be able to connect.
- First choose the Controller Component from the drop down.

Next, create a new group named
nodeby clicking the [+] button.You can now target and add specific Permissions or Resources for the Group. Click the circular (💻) icon on the right to highlight what permission should be set for Nodes to communicate with the Controller. Then check/enable the highlighted permissions and click Save Permissions at the bottom of the page. Important: Finally, do the same but under the Registry Component.
Note: We’ll not be setting Resources right now.
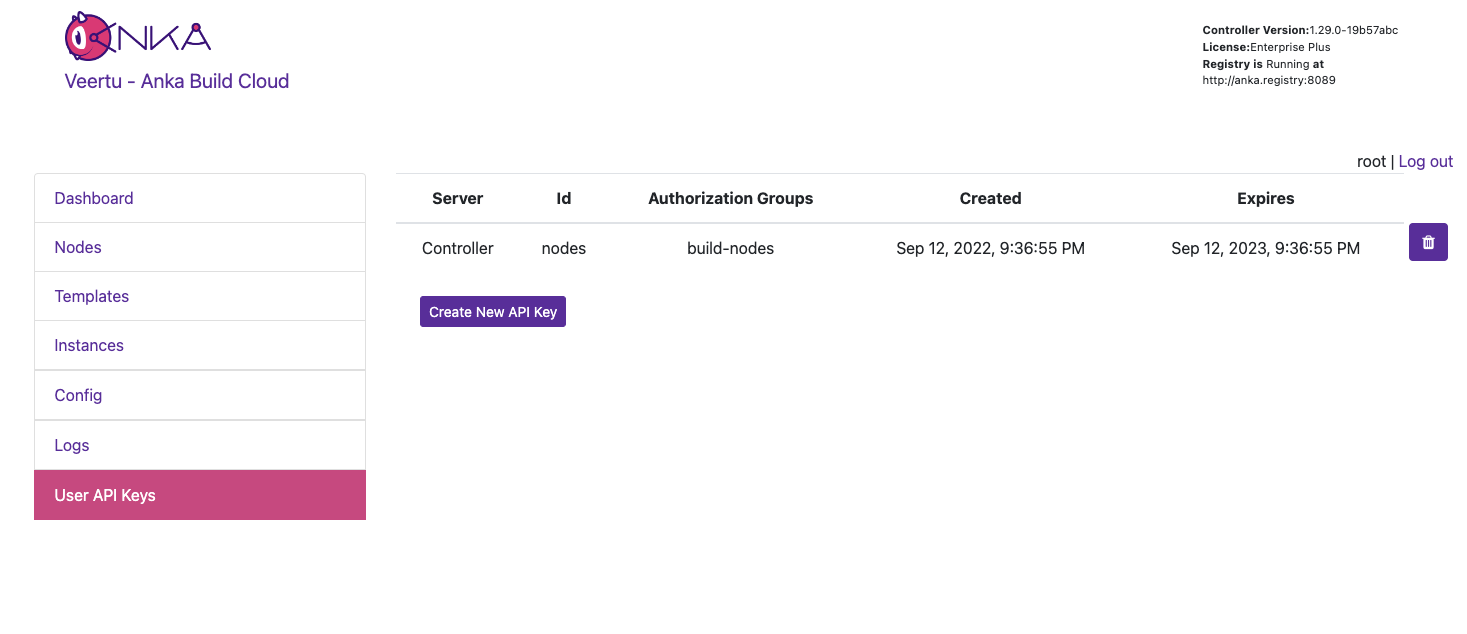
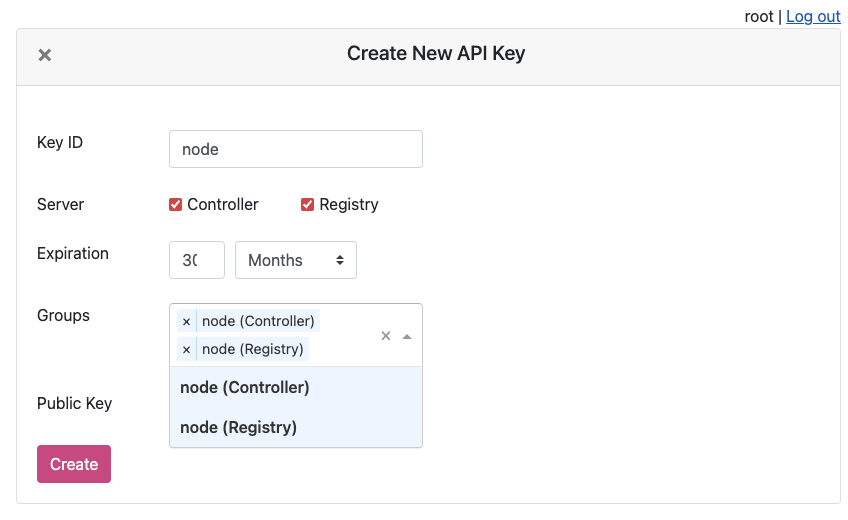
- The group can now be attached to a specific Authentication Credential and the credential used to access and perform the permitted actions. For example, create a UAK and attach the group.
Be sure to download the key if you’re creating a new UAK.
You will now see the UAK in the list.

The node certificate now has permissions to perform the specifically set actions against all Resources (if Resource Management is disabled).
- You can now try joining the node to the Controller using the UAK and confirm it’s all joined by checking the Controller Nodes page, or the agent logs.
❯ sudo ankacluster join http://anka.controller:8090 --api-key-file ~/node.cer --api-key-id "node"
Testing connection to the controller...: Ok
Testing connection to the registry...: Ok
Success!
Anka Cloud Cluster join success
Resources + Resource Permissions
Node Groups are disabled while Resource Management is enabled.
The Resource Management/Permissions feature is enabled by setting ANKA_ENABLE_RESOURCE_MANAGEMENT to true in your configuration. Once enabled, it unlocks the Resources tab under /permission-groups.
Within the Resources tab you will be able to, depending on the Component selected, add specific Nodes or Template Resources to the Group. This limits the Group to certain actions that can be performed against those Resources.
An example of this is allowing the iOS team/group to distribute specific Templates to specific Nodes, but not create VM Instances or delete the Node.
In the previous section on Group Permissions, we joined a Node using a credential with the Group node attached. This Group only has Permissions to perform the minimum required actions to run as an Anka Node and communicate with the Controller. We did not add Resources to it though (even though we technically could) so we can instead have team specific Groups and credentials.
In this example, each team gets only their Node or Template Resources assigned to their Group, with no ability to make API calls to Components/Permissions. Instead, other non-team Groups handle the ability to call certain endpoints and perform certain actions to the Controller and Registry. Individual groups (team and non-team related) are then assigned to certain credential, combining the Permissions and Resources.
It’s important to understand that a single credential, like a UAK or a Certificate, should only ever be used by a single user or client. You wouldn’t ever want to share the Node credential with a team for example. Create a second credential for that team, then in order for the Node to be able to access the team’s credential, add the team’s Group to the Node credential.
Create two groups:
iosandinstance-control.Under the
iosGroup > Resources, add the Template Resource you want this team to access. The bare minimum permissions are seen in the image below.
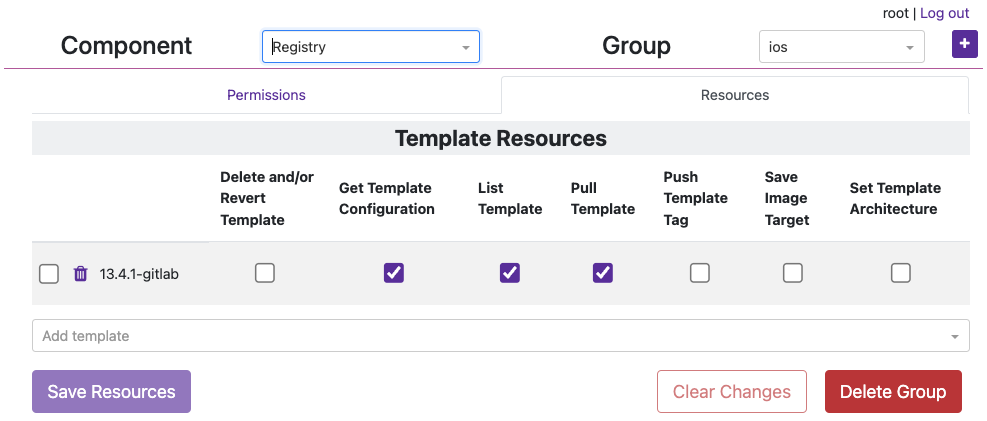
- Under the
instance-controlGroup > Permissions, add all of the Instances Permissions like in the image below.

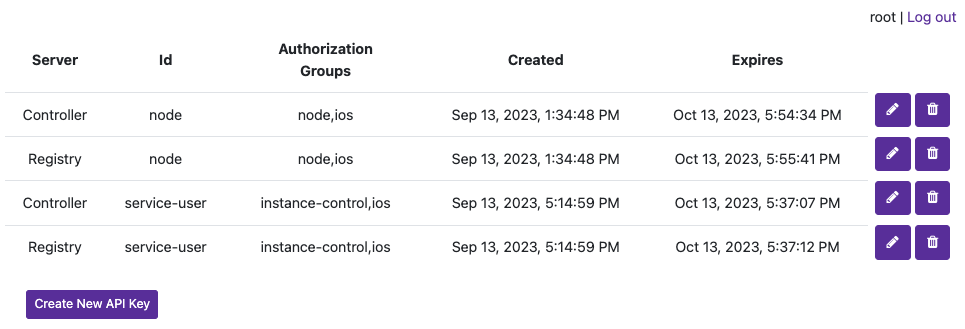
Now create a new credential (not Group) named
service-userand attach those two groups. We’ll use UAKs for this example. There is no need for theservice-userto have its own group as it will get the VM start and terminate permissions frominstance-controlgroup and Template/Node permissions from theiosgroup.Attach the group
iosto thenodecredential we created in the previous section and joined our node with so that that it can also collect information about the Template in order to start the VM Instance properly (it checks the download size of the template before pulling). Your UAK setup should look something like this image.
We can now use the service-user credential in your CI/CD tools to communicate with the Controller when an ios team member triggers a job. When the service-user credential makes an API call to start a VM Instance, it will pass in the ios group. That ios group has access to the template being targeted and is required.
Node Groups
The method described above works well for sharing the same nodes amongst all teams in an organization. But what if you want to isolate specific nodes to specific teams? Node Groups are disabled when Resource Management is enabled, but that should make sense to you by now as Node access/permissions are now bound to a specific Group + a specific credential. There are are several other scenarios possible which we’ll detail below.
You cannot have a shared Node credential and also limit by Node Resources for specific teams.
Scenario 1: Team Specific Anka Nodes
This configuration allows isolating certain Nodes to certain teams. The service-user credential is necessary to make API calls. In the Controller > Instances page or the API the team member can now start VM Instances with the group team1 (or 2, 3) and it will only start on the Nodes assigned to the team’s group. This is due to the Resource Permission for the Node being attached to the team group.
High Level Overview
- Three Anka Nodes joined to the Controller, each with separate credentials.
- Three Node credentials used to join:
- UAK: team1-nodes - Groups attached: node,team1
- UAK: team2-nodes - Groups attached: node,team2
- UAK: team3-nodes - Groups attached: node,team3
- Three “service user” credentials for teams to make API calls:
- UAK: team1-su | Groups attached: service-user,team1
- UAK: team2-su - Groups attached: service-user,team2
- UAK: team3-su - Groups attached: service-user,team3
- Group
nodehas- Permissions: Recommended Node permissions (see UI).
- Resources: None.
- Group
service_userhas- Permissions: Instances, Nodes, and Distribute.
- Resources: None.
- Group
team1/team2/team3has- Permissions: None.
- Resources: The specific Node (and other Resources) for the team.
Scenario 2: Shared Anka Nodes / Teams limited by VM Template Resource Permissions
This configuration allows all teams to share all Anka Node capacity, but only be able to start specific VMs from specific Templates Resources assigned to their team’s Permission Group.
High Level Overview
- Three Anka Nodes joined to the Controller, each with the same credential.
- Three Node credentials used to join:
- UAK: nodes - Groups attached: node,team1,team2,team3
- UAK: nodes - Groups attached: node,team1,team2,team3
- UAK: nodes - Groups attached: node,team1,team2,team3
- Three “service user” credentials for teams to make API calls:
- UAK: team1-su | Groups attached: service-user,team1
- UAK: team2-su - Groups attached: service-user,team2
- UAK: team3-su - Groups attached: service-user,team3
- Group
nodehas- Permissions: Recommended Node permissions (see UI).
- Resources: None.
- Group
service_userhas- Permissions: Instances, Nodes, and Distribute.
- Resources: None.
- Group
team1/team2/team3has- Permissions: None.
- Resources: The specific Template Resources for that team. No Nodes.
Scenario 3: Team Specific Anka Nodes + Dynamic Nodes
This configuration allows teams to have specific nodes guaranteed, then admins to increase capacity by assigning the specific team’s group to the nodes.
High Level Overview
- Four Anka Nodes joined to the Controller, each with separate credentials. Three get assign to specific teams, but the fourth can dynamically change to provide extra capacity to specific teams when needed.
- Four Node credentials used to join:
- UAK: team1-nodes - Groups attached: node,team1
- UAK: team2-nodes - Groups attached: node,team2
- UAK: team3-nodes - Groups attached: node,team3
- UAK: dynamic-nodes - Groups attached: node
- Dynamically update this UAK’s groups to add any team or teams that need the extra capacity
- Three “service user” credentials for teams to make API calls:
- UAK: team1-su | Groups attached: service-user,team1
- UAK: team2-su - Groups attached: service-user,team2
- UAK: team3-su - Groups attached: service-user,team3
- Group
nodehas- Permissions: Recommended Node permissions (see UI).
- Resources: None.
- Group
service_userhas- Permissions: Instances, Nodes, and Distribute.
- Resources: None.
- Group
team1/team2/team3has- Permissions: None.
- Resources: The specific Node (and other Resources) for the team.
Answers to Frequently Asked Questions
- The Nodes joined to the Controller must have Permissions to access the Template being used to start a VM. This mean at least one of the groups attached to a node credential must have the template resource attached.
- Node Groups differ from Permissions Groups and are disabled when this feature is enabled.
- Save Image requests can only target Instances that belong to a group the user has access to.