Configuring OpenID Connect (OIDC) / SSO based authentication
Many organizations and developers are already familiar with OpenID Connect (OIDC). OIDC is a layer that sits on top of OAuth 2.0 and performs the authorization necessary to access protected resources, such as the Anka Build Cloud Controller. This page walks through what you need to know to set it up and protect your Controller Dashboard/UI, with a full Okta example.
Important
- Requires an Anka Enterprise Plus license.
- It currently only protects the UI/Dashboard and is not available for API or others types of protection.
- Your Nodes will lose connection until you join them using the new credential.
- We currently only support
Code/Explicit Flow.
Okta must support custom authorization servers. Please check with your Okta admin to ensure this is possible.
Configure Anka Controller OIDC with Okta
1. Gather the required information
Before you configure Okta, determine the externally visible Controller URL.
Production example:
https://controller.example.com
Local test example:
http://anka.controller.local
The Controller constructs its callback URL from the browser-visible origin:
<CONTROLLER_ORIGIN>/oidc/v1/callback
Therefore, the examples above use:
https://controller.example.com/oidc/v1/callback
http://anka.controller.local/oidc/v1/callback
The scheme, hostname, port, and path must match exactly. If users can access the Controller through multiple origins, register every corresponding callback URI.
Use HTTPS in production.
2. Create the Okta application
In the Okta Admin Console:
Open Applications → Applications.
Select Create App Integration.
Select OIDC - OpenID Connect.
Select Web Application.
Configure:
App integration name:
Anka ControllerGrant type:
Authorization CodeSign-in redirect URI:
https://controller.example.com/oidc/v1/callbackSign-out redirect URI:
https://controller.example.com
Under Controlled access, choose which users may use the integration.
For production, assigning specific Okta groups is recommended. If Allow everyone in your organization to access is selected, every Okta user can authenticate, although Controller permissions still determine what they can do.
Save the integration and securely record:
- Client ID
- Client secret
Okta’s official guide covers the same OIDC web-application and redirect model: Sign users in to a web app using the redirect model.
3. Configure the authorization server
Use an Okta custom authorization server. Most Okta organizations provide one named default.
Open:
Security → API → Authorization Servers → default
The corresponding Controller provider URL is:
https://<OKTA_DOMAIN>/oauth2/default
Example:
https://example.okta.com/oauth2/default
Do not use only https://example.okta.com when the claims were configured on the default custom authorization server.
Don’t know what URL to use for your provider? The provider URL + /.well-known/openid-configuration must lead to the issuer’s OIDC config.Add an access policy
Open the authorization server’s Access Policies tab.
- Select Add Policy.
- Give it a name such as
Anka Controller. - Assign it to the Anka Controller client application.
Assigning the policy only to the Anka client is preferable to using All Clients.
Add a rule with:
- Rule name:
Allow Anka Controller login - Grant type: Authorization Code
- User: Any user assigned to the app
- Scopes: Any scopes, or at minimum
openid,profile, andemail - Token lifetime: Use the organization’s security policy
An access policy and at least one matching rule are required. Some newer Okta organizations don’t create a default policy automatically. See Okta access policies.
4. Add the groups claim
The Controller expects a claim named groups by default. It uses that claim for authorization.
Open:
Security → API → Authorization Servers → default → Claims
Select Add Claim and configure:
- Name:
groups - Include in token type:
ID Token - ID token inclusion:
Always - Value type:
Groups - Filter:
Matches regex - Value:
.* - Include in: Any scope
For initial testing, .* is convenient because it includes every matching Okta group. For production, restrict the expression to Controller groups, for example:
^anka-.*
Then use Controller group names such as:
anka-users
anka-operators
anka-administrators
Okta limits the number of groups that can be included in a groups claim, so a restricted filter is safer for organizations with many groups. If Okta returns too many groups, login can succeed in Okta and then return you to the Controller login page. See Customize tokens with a groups claim.
Configure the claim in the ID token, not only the access token. By default, the Controller extracts its user and group claims from the ID token.
5. Configure MFA
MFA is controlled by Okta’s authentication policy, independently of the OIDC application configuration.
Open the Anka Controller application and select its Sign On or Authentication Policy settings. Assign a policy appropriate for the organization, such as:
Password + another factor
Users must enroll in an allowed factor, such as Okta Verify, before they can complete login.
6. Create and assign Okta groups
In Okta:
Open Directory → Groups.
Create the desired groups.
Use lowercase names to make matching predictable, for example:
team1
team2
anka-administrators
Open each group and select Assign people.
Add the appropriate users.
If application access is restricted by assignment, also assign these groups to the Anka Controller application.
Okta group management is documented under Groups.
7. Configure the Controller
Add the following environment variables to the Controller service:
ANKA_ENABLE_AUTH=true
ANKA_ENABLE_CONTROLLER_AUTHORIZATION=true

ANKA_ROOT_TOKEN=<STRONG-ADMIN-TOKEN>

ANKA_OIDC_PROVIDER_URL=https://<OKTA_DOMAIN>/oauth2/default
ANKA_OIDC_CLIENT_ID=<OKTA-CLIENT-ID>
ANKA_OIDC_CLIENT_SECRET=<OKTA-CLIENT-SECRET>
ANKA_OIDC_DISPLAY_NAME="Company Okta"

ANKA_OIDC_USERNAME_CLAIM=name
ANKA_OIDC_GROUPS_CLAIM=groups
For the local test domain:
ANKA_OIDC_PROVIDER_URL=https://<OKTA_DOMAIN>/oauth2/default
The provider URL remains the Okta URL; anka.controller.local is used only as the Controller origin and callback host.
Optional settings:
ANKA_OIDC_USER_INFO=false
Keep this disabled when name, email, and groups are present in the ID token. Enable it only when the identity provider intentionally returns the required claims through its UserInfo endpoint.
The OIDC ENVs must be set for both the Controller and Registry services.
Restart the Controller after changing its environment.
Here is an example docker-compose config for Okta:
  anka-controller:
    container_name: anka-controller
    build:
       context: .
       dockerfile: anka-controller.docker
    ports:
       - "8090:80"
    volumes:
       - /Users/myUserName:/mnt/cert
    depends_on:
       - etcd
       - anka-registry
    restart: always
    environment:
      ANKA_ANKA_REGISTRY: "https://anka.registry:8089"
      ANKA_USE_HTTPS: "true"
      ANKA_SKIP_TLS_VERIFICATION: "false"
      ANKA_SERVER_CERT: "/mnt/cert/anka-controller-crt.pem"
      ANKA_SERVER_KEY: "/mnt/cert/anka-controller-key.pem"
      ANKA_CA_CERT: "/mnt/cert/anka-ca-crt.pem"
      ANKA_ENABLE_AUTH: "true"
      ANKA_ENABLE_CONTROLLER_AUTHORIZATION: "true"
      ANKA_ROOT_TOKEN: "1111111111"
      ANKA_OIDC_DISPLAY_NAME: "Company Okta"
      ANKA_OIDC_PROVIDER_URL: "https://dev-1234567.okta.com/oauth2/default"
      ANKA_OIDC_CLIENT_ID: "0oa7a07mc0kQxyfrus11"
      ANKA_OIDC_CLIENT_SECRET: "aHWQYCbH0mTYwLwwIfBvT-JWotYQAR8HAn7glnSB"
      ANKA_OIDC_USERNAME_CLAIM: "name"
      ANKA_OIDC_GROUPS_CLAIM: "groups"
      ANKA_OIDC_USER_INFO: "false"

  anka-registry:
    container_name: anka-registry
    build:
        context: .
        dockerfile: anka-registry.docker
    ports:
        - "8089:8089"
    restart: always
    volumes:
      - "/Library/Application Support/Veertu/Anka/registry:/mnt/vol"
      - /Users/myUser/:/mnt/cert
    environment:
      ANKA_USE_HTTPS: "true"
      ANKA_SKIP_TLS_VERIFICATION: "false"
      ANKA_SERVER_CERT: "/mnt/cert/anka-controller-crt.pem"
      ANKA_SERVER_KEY: "/mnt/cert/anka-controller-key.pem"
      ANKA_CA_CERT: "/mnt/cert/anka-ca-crt.pem"
      ANKA_ENABLE_AUTH: "true"
      ANKA_OIDC_DISPLAY_NAME: "Company Okta"
      ANKA_OIDC_PROVIDER_URL: "https://dev-1234567.okta.com/oauth2/default"
      ANKA_OIDC_CLIENT_ID: "0oa7a07mc0kQxyfrus11"
      ANKA_OIDC_CLIENT_SECRET: "aHWQYCbH0mTYwLwwIfBvT-JWotYQAR8HAn7glnSB"
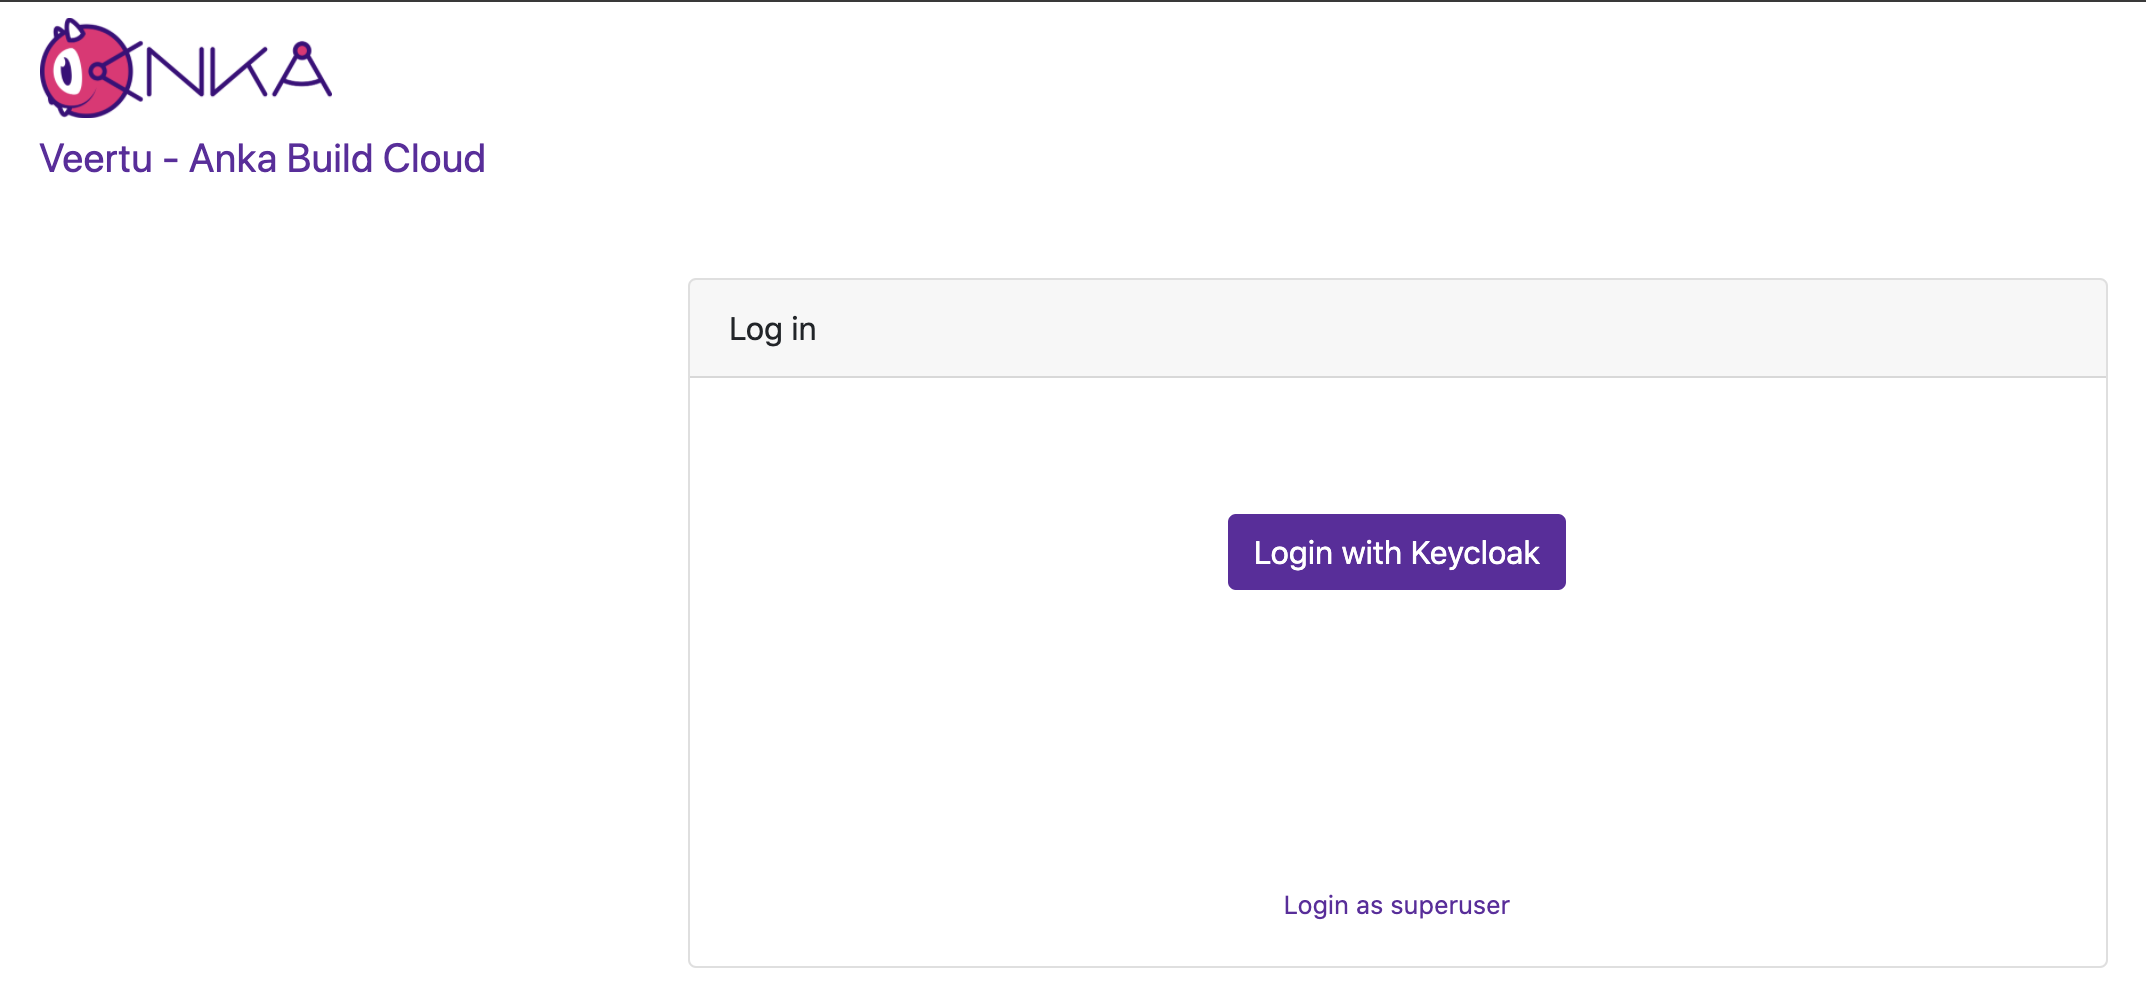
After that, run docker-compose down -t 50 && docker-compose up -d and open the Controller at its HTTPS URL. You should see a Log In box with two options: Login with Company Okta and Login with superuser.
8. Create matching Controller permission groups
Authentication and authorization are separate:
- Okta authenticates the user and sends group names.
- Anka Controller maps those names to Controller permission groups.
- A user whose Okta groups do not match any Controller permission group can log in but may see an empty dashboard.
Log into the Controller as the superuser:
- Username:
root - Password: value of
ANKA_ROOT_TOKEN
Then:
- Open Permissions.
- Select the Controller component.
- Create a group whose name exactly matches the Okta group.
- Assign the required permissions.
- Save the group.
Example:
Okta group:       team1
Controller group: team1
Group matching is case-sensitive in practice. Prefer lowercase group names on both sides.
If Registry authorization is enabled, select the Registry component and configure the same group’s Registry permissions as well.
If resource management is enabled, use the group’s Resources tab to limit access to specific templates, nodes, or other resources.
For full detail on permission groups, resources, and resource permissions, see Managing User/Group Permissions (Authorization).
9. Test the integration
Use a private/incognito browser so an existing Okta administrator session does not interfere.
- Open the externally visible Controller URL.
- Select Login with Company Okta.
- Sign in as a non-administrator test user.
- Complete MFA if required.
- Confirm that the user can open the pages permitted by their Controller group.
After changing Okta group membership, the user must log out and log back in. Existing tokens retain the old group list until a new OIDC login completes.
A successful token should contain claims similar to:
{
  "name": "Team1 User1",
  "email": "[email protected]",
  "groups": [
    "Everyone",
    "team1"
  ]
}
Do not paste production ID tokens into public JWT-decoding websites. Use Okta’s Token Preview or an approved internal tool.
Troubleshooting
Login succeeds, but the dashboard is blank
Most likely cause:
groups: ["Everyone"]
with no matching Everyone Controller permission group.
Verify that:
- The user belongs to the intended Okta group.
- The groups claim is included in the ID token.
- The Controller group has exactly the same name.
- Permissions are assigned to that Controller group.
- The user logged out and back in after the membership change.
“User is not assigned to the client application”
The user or one of their groups has not been assigned to the Okta application, or the application’s controlled-access setting is too restrictive.
Okta returns access_denied
Check the custom authorization server:
- An access policy exists.
- The policy applies to the Anka Controller client.
- A matching rule exists.
- Authorization Code is permitted.
- The user satisfies the rule.
Redirect URI mismatch
Confirm the exact callback URI:
https://controller.example.com/oidc/v1/callback
Check the scheme, hostname, port, and path. The Controller uses the origin visible in the user’s browser, including a nonstandard port if present.
Controller reports a missing groups claim
The claim may have been:
- Added only to the access token
- Added to a different authorization server
- Configured with a filter that matches no groups
- Configured under a different claim name
Either name it groups or set:
ANKA_OIDC_GROUPS_CLAIM=<CUSTOM-CLAIM-NAME>
User name claim is missing
The default username claim is name. If the provider doesn’t supply it, use another ID-token claim:
ANKA_OIDC_USERNAME_CLAIM=email
Security precautions
- Store the OIDC client secret in a secrets manager.
- Use a strong, unique
ANKA_ROOT_TOKEN. - Use HTTPS for all production Controller URLs.
- Restrict Okta app assignments and group-claim filters.
- Avoid high Controller verbosity in production: verbose OIDC diagnostics may log tokens or claims.
- Rotate the Okta client secret if it is exposed, then update the Controller and restart it.
Managing User/Group Permissions (Authorization)
After Okta returns group names in the ID token, add those exact names as Controller permission groups and assign permissions. This gives users in the matching Okta group access to the Controller UI and API actions you allow.
Authorization allows you to control access to specific actions/endpoints of the API and even specific Resources like Nodes and Templates in your Controller and Registry. It has four parts to it that are important to understand:
- Component (Controller or Registry)
- Groups
- Permissions
- Resources
- Permissions
- Groups
Groups are the wrappers for all Permissions and Resources. You attach a Groups to a Authentication credential to enable certain access.
- Group Permissions are given to allow a credential access to perform a specific action, like listing or creating a VM Instances. Because these control general access to the API to make calls, it overrides any Resource Permissions.
Resources limit which Nodes and Templates the credential can control.
- Resource Permissions are given to a Resource, further limiting the Group’s access per Resource. As an example, these Resource Permissions allow an admin to prevent a specific Group from deleting a Node from the cloud, yet allow changes to its config, and more. It’s critical to understand that if the Groups Permission “Instances > Start” is not checked, the Resource Permissions for the Group allowing Create Instance won’t matter as the credential has no access to make a Start VM API call.
- Resource Management, which enables Resource control, is optional. If disabled, all Resources (and Resource Permissions) are available to all credentials.
After a Group is created, you’ll assign it to a specific credential. The credential can have one or more Groups attached and it’s important you consider how much access for each Group you need to provide for your use-case and security requirements.
In this guide we will start with the most common use-case of sharing Node between multiple teams (Groups), then explain how to isolate Nodes per team (similar to how the older Node Groups worked) later on.
Prerequisites
To enable Authorization features, you’ll need to ensure:
Authentication is enabled by setting
ANKA_ENABLE_AUTHandANKA_ROOT_TOKENENVs in your Controller & Registry config. You’re also familiar with one of the existing Authentication methods and have one set up.Groups + Group Permissions are enabled by enabling Authorization. The following ENVs can be added to your config to achieve this:
ANKA_ENABLE_CONTROLLER_AUTHORIZATION(boolean) works for both macOS and docker controller packages.ANKA_ENABLE_REGISTRY_AUTHORIZATION(boolean) works for the macOS registry package only.ANKA_ENABLE_AUTHORIZATION(boolean) is only for the registry.
This should expose the
https://<controller address>/#/permission-groupspage in your Controller.Resource Permissions are enabled by setting
ANKA_ENABLE_RESOURCE_MANAGEMENTtotruein your configuration.
License Considerations: These features are only available for Enterprise tier licenses.
- Enterprise license customers cannot control authorization and each authentication credential will have full access to the system.
- However, Enterprise Plus customers will be able to use Permission Groups and Resources to have more fine-grained control over access.
Groups + Group Permissions
Do not confuse Node Groups with Groups/Group Permissions.
Under the Permissions section of the Controller UI (https://<controller address>/#/permission-groups), let’s create a group for our nodes to be able to connect.
- First choose the Controller Component from the drop down.

Next, create a new group named
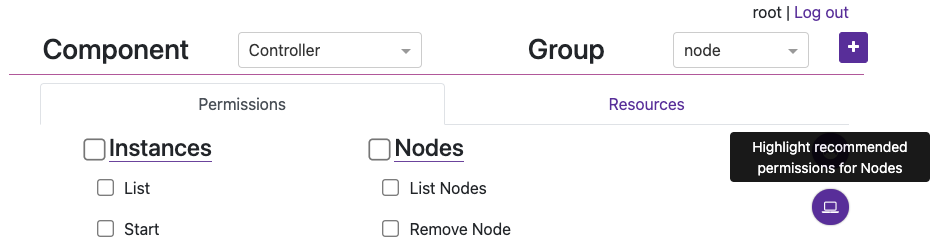
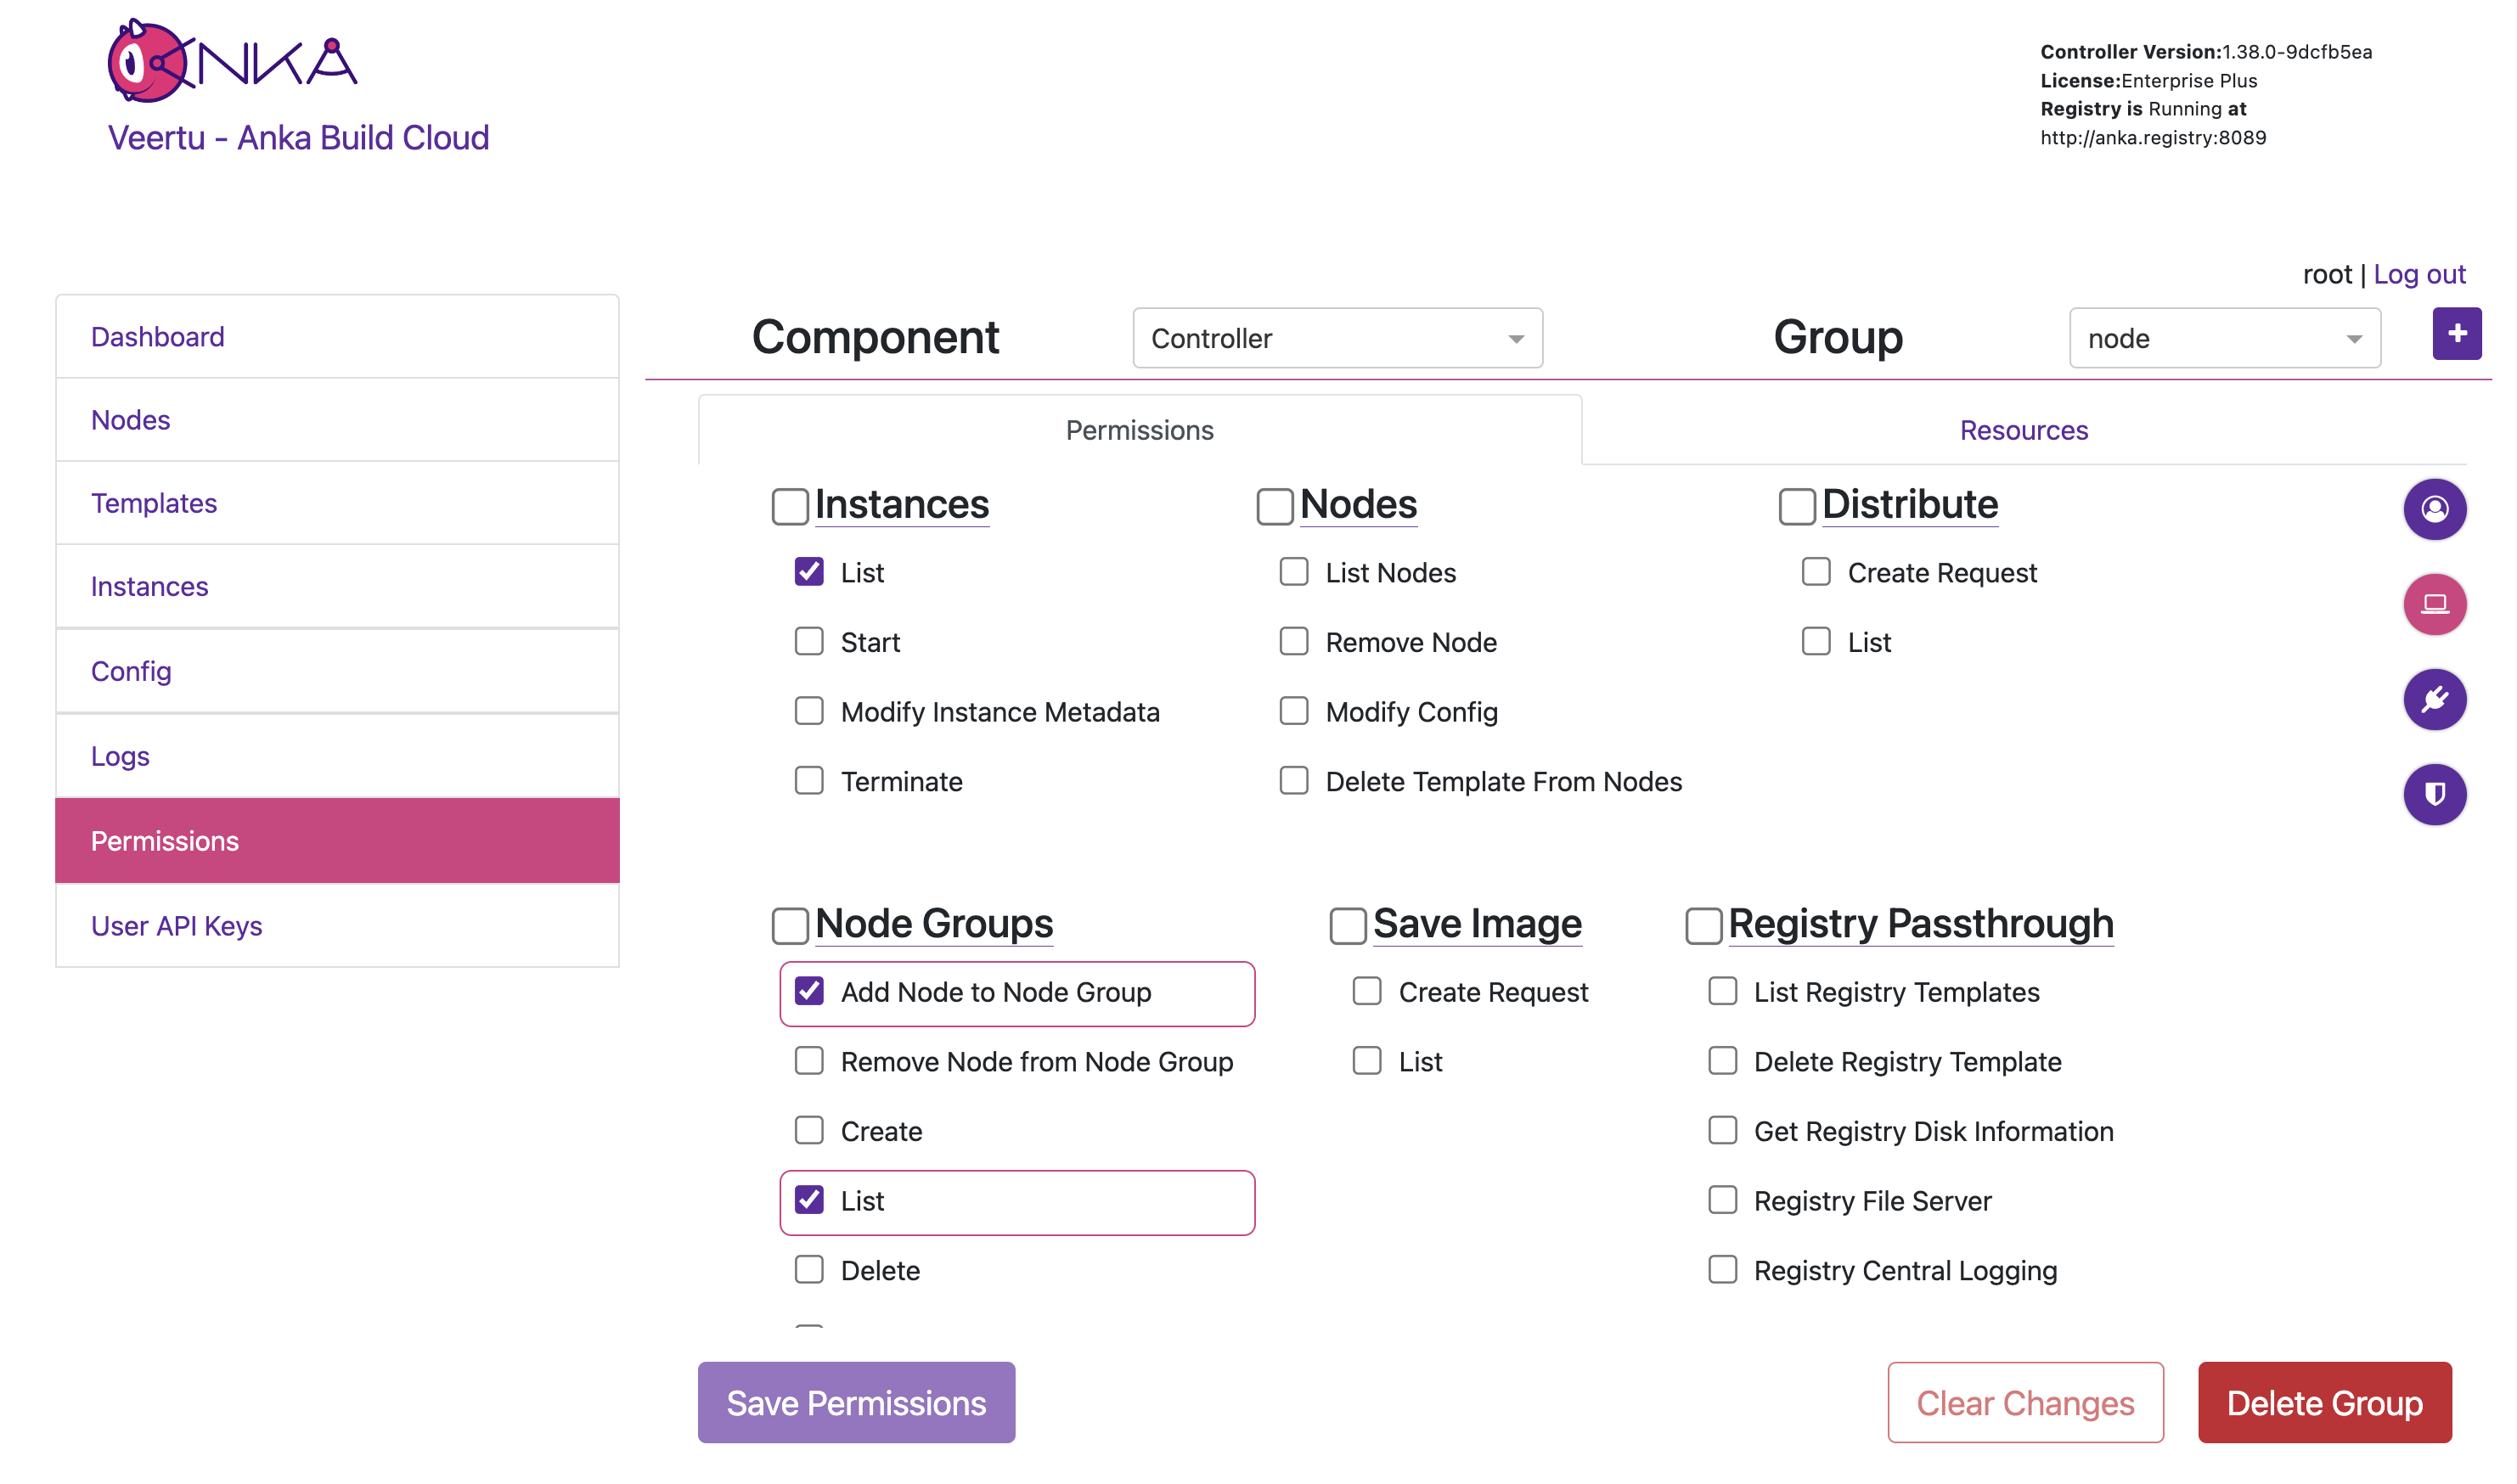
nodeby clicking the [+] button.You can now target and add specific Permissions or Resources for the Group. Click the circular (💻) icon on the right to highlight what permission should be set for Nodes to communicate with the Controller. Then check/enable the highlighted permissions and click Save Permissions at the bottom of the page. Important: Finally, do the same but under the Registry Component.
Note: We’ll not be setting Resources right now.
- The group can now be attached to a specific Authentication Credential and the credential used to access and perform the permitted actions. For example, create a UAK and attach the group.
Be sure to download the key if you’re creating a new UAK.
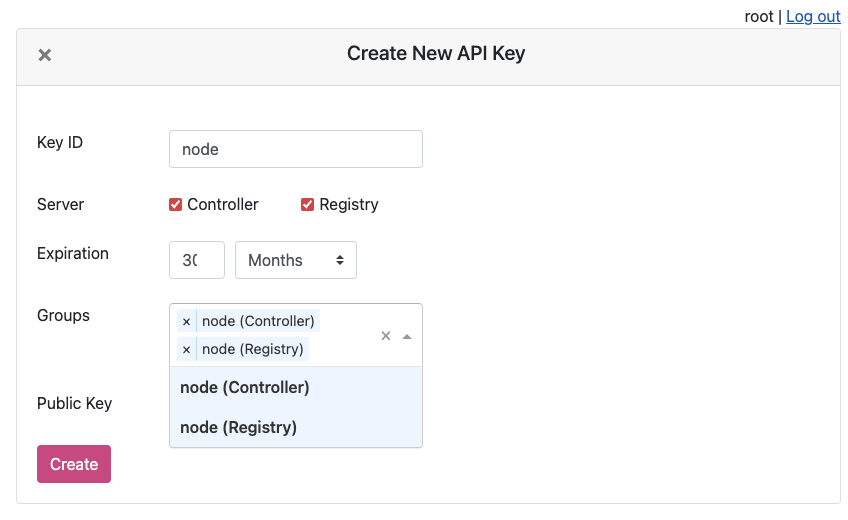
You will now see the UAK in the list.

The node certificate now has permissions to perform the specifically set actions against all Resources (if Resource Management is disabled).
- You can now try joining the node to the Controller using the UAK and confirm it’s all joined by checking the Controller Nodes page, or the agent logs.
❯ sudo ankacluster join http://anka.controller:8090 --api-key-file ~/node.cer --api-key-id "node"
Testing connection to the controller...: Ok
Testing connection to the registry...: Ok
Success!
Anka Cloud Cluster join success
Resources + Resource Permissions
Node Groups are disabled while Resource Management is enabled.
The Resource Management/Permissions feature is enabled by setting ANKA_ENABLE_RESOURCE_MANAGEMENT to true in your configuration. Once enabled, it unlocks the Resources tab under /permission-groups.
Within the Resources tab you will be able to, depending on the Component selected, add specific Nodes or Template Resources to the Group. This limits the Group to certain actions that can be performed against those Resources.
An example of this is allowing the iOS team/group to distribute specific Templates to specific Nodes, but not create VM Instances or delete the Node.
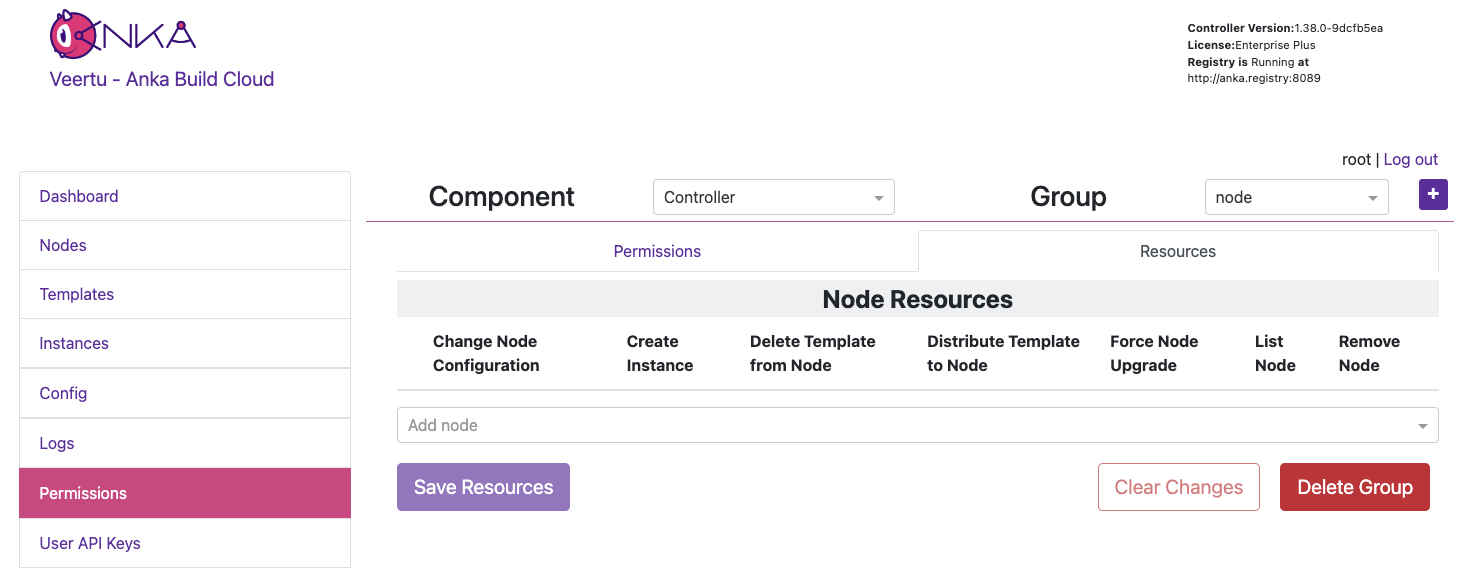
In the previous section on Group Permissions, we joined a Node using a credential with the Group node attached. This Group only has Permissions to perform the minimum required actions to run as an Anka Node and communicate with the Controller. We did not add Resources to it though (even though we technically could) so we can instead have team specific Groups and credentials.
In this example, each team gets only their Node or Template Resources assigned to their Group, with no ability to make API calls to Components/Permissions. Instead, other non-team Groups handle the ability to call certain endpoints and perform certain actions to the Controller and Registry. Individual groups (team and non-team related) are then assigned to certain credential, combining the Permissions and Resources.
It’s important to understand that a single credential, like a UAK or a Certificate, should only ever be used by a single user or client. You wouldn’t ever want to share the Node credential with a team for example. Create a second credential for that team, then in order for the Node to be able to access the team’s credential, add the team’s Group to the Node credential.
Create two groups:
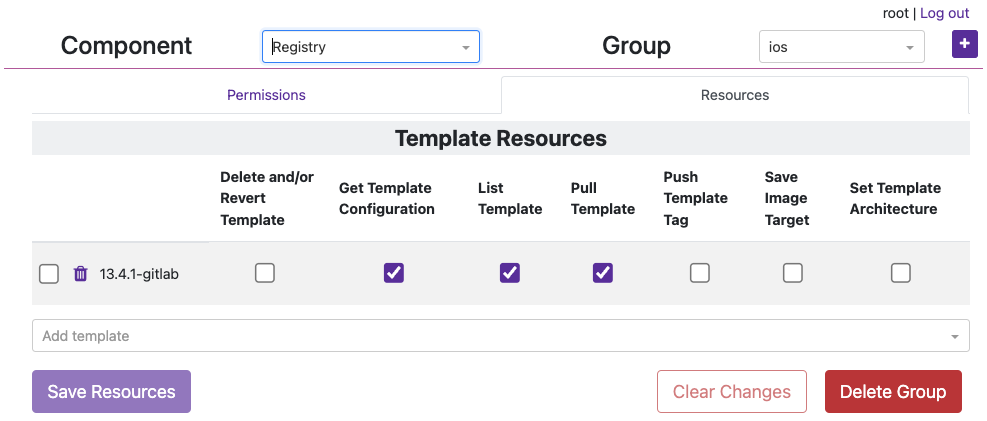
iosandinstance-control.Under the
iosGroup > Resources, add the Template Resource you want this team to access. The bare minimum permissions are seen in the image below.
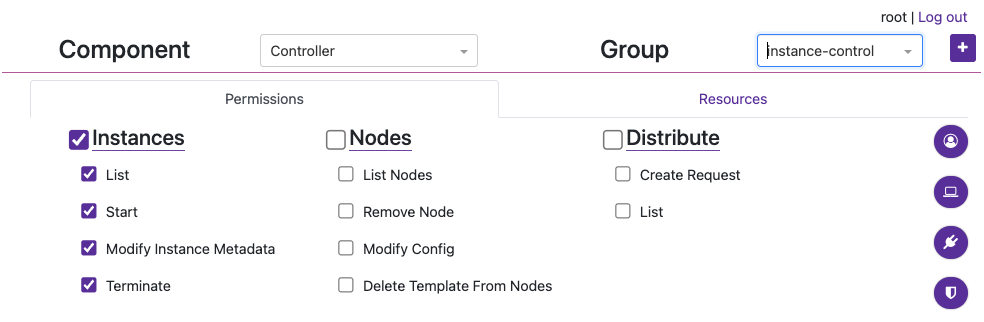
- Under the
instance-controlGroup > Permissions, add all of the Instances Permissions like in the image below.
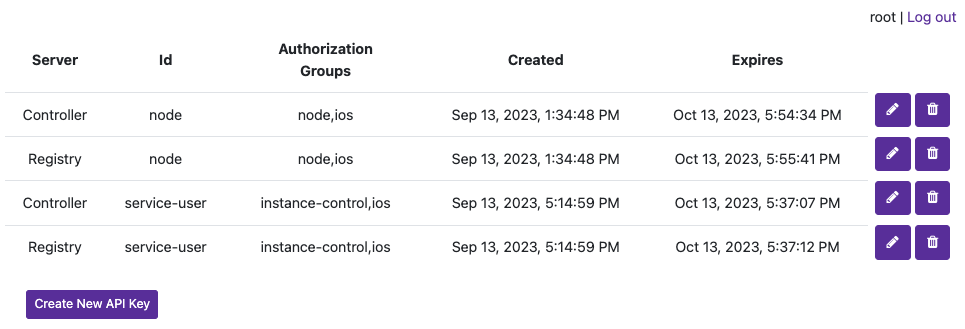
Now create a new credential (not Group) named
service-userand attach those two groups. We’ll use UAKs for this example. There is no need for theservice-userto have its own group as it will get the VM start and terminate permissions frominstance-controlgroup and Template/Node permissions from theiosgroup.Attach the group
iosto thenodecredential we created in the previous section and joined our node with so that that it can also collect information about the Template in order to start the VM Instance properly (it checks the download size of the template before pulling). Your UAK setup should look something like this image.
We can now use the service-user credential in your CI/CD tools to communicate with the Controller when an ios team member triggers a job. When the service-user credential makes an API call to start a VM Instance, it will pass in the ios group. That ios group has access to the template being targeted and is required.
Node Groups
The method described above works well for sharing the same nodes amongst all teams in an organization. But what if you want to isolate specific nodes to specific teams? Node Groups are disabled when Resource Management is enabled, but that should make sense to you by now as Node access/permissions are now bound to a specific Group + a specific credential. There are are several other scenarios possible which we’ll detail below.
You cannot have a shared Node credential and also limit by Node Resources for specific teams.
Scenario 1: Team Specific Anka Nodes
This configuration allows isolating certain Nodes to certain teams. The service-user credential is necessary to make API calls. In the Controller > Instances page or the API the team member can now start VM Instances with the group team1 (or 2, 3) and it will only start on the Nodes assigned to the team’s group. This is due to the Resource Permission for the Node being attached to the team group.
High Level Overview
- Three Anka Nodes joined to the Controller, each with separate credentials.
- Three Node credentials used to join:
- UAK: team1-nodes - Groups attached: node,team1
- UAK: team2-nodes - Groups attached: node,team2
- UAK: team3-nodes - Groups attached: node,team3
- Three “service user” credentials for teams to make API calls:
- UAK: team1-su | Groups attached: service-user,team1
- UAK: team2-su - Groups attached: service-user,team2
- UAK: team3-su - Groups attached: service-user,team3
- Group
nodehas- Permissions: Recommended Node permissions (see UI).
- Resources: None.
- Group
service_userhas- Permissions: Instances, Nodes, and Distribute.
- Resources: None.
- Group
team1/team2/team3has- Permissions: None.
- Resources: The specific Node (and other Resources) for the team.
Scenario 2: Shared Anka Nodes / Teams limited by VM Template Resource Permissions
This configuration allows all teams to share all Anka Node capacity, but only be able to start specific VMs from specific Templates Resources assigned to their team’s Permission Group.
High Level Overview
- Three Anka Nodes joined to the Controller, each with the same credential.
- Three Node credentials used to join:
- UAK: nodes - Groups attached: node,team1,team2,team3
- UAK: nodes - Groups attached: node,team1,team2,team3
- UAK: nodes - Groups attached: node,team1,team2,team3
- Three “service user” credentials for teams to make API calls:
- UAK: team1-su | Groups attached: service-user,team1
- UAK: team2-su - Groups attached: service-user,team2
- UAK: team3-su - Groups attached: service-user,team3
- Group
nodehas- Permissions: Recommended Node permissions (see UI).
- Resources: None.
- Group
service_userhas- Permissions: Instances, Nodes, and Distribute.
- Resources: None.
- Group
team1/team2/team3has- Permissions: None.
- Resources: The specific Template Resources for that team. No Nodes.
Scenario 3: Team Specific Anka Nodes + Dynamic Nodes
This configuration allows teams to have specific nodes guaranteed, then admins to increase capacity by assigning the specific team’s group to the nodes.
High Level Overview
- Four Anka Nodes joined to the Controller, each with separate credentials. Three get assign to specific teams, but the fourth can dynamically change to provide extra capacity to specific teams when needed.
- Four Node credentials used to join:
- UAK: team1-nodes - Groups attached: node,team1
- UAK: team2-nodes - Groups attached: node,team2
- UAK: team3-nodes - Groups attached: node,team3
- UAK: dynamic-nodes - Groups attached: node
- Dynamically update this UAK’s groups to add any team or teams that need the extra capacity
- Three “service user” credentials for teams to make API calls:
- UAK: team1-su | Groups attached: service-user,team1
- UAK: team2-su - Groups attached: service-user,team2
- UAK: team3-su - Groups attached: service-user,team3
- Group
nodehas- Permissions: Recommended Node permissions (see UI).
- Resources: None.
- Group
service_userhas- Permissions: Instances, Nodes, and Distribute.
- Resources: None.
- Group
team1/team2/team3has- Permissions: None.
- Resources: The specific Node (and other Resources) for the team.
Answers to Frequently Asked Questions
- The Nodes joined to the Controller must have Permissions to access the Template being used to start a VM. This mean at least one of the groups attached to a node credential must have the template resource attached.
- Node Groups differ from Permissions Groups and are disabled when this feature is enabled.
- Save Image requests can only target Instances that belong to a group the user has access to.
Once the permissions are set, log out of the superuser account and choose Login with Company Okta. Okta authenticates the user, then the Controller applies the matching permission group.
FAQ
How do I confirm the correct ANKA_OIDC_PROVIDER_URL?
Open:
<ANKA_OIDC_PROVIDER_URL>/.well-known/openid-configuration
That URL must return the issuer’s OIDC discovery document. For Okta’s default custom authorization server, the provider URL is usually:
https://<OKTA_DOMAIN>/oauth2/default
So the discovery document is:
https://<OKTA_DOMAIN>/oauth2/default/.well-known/openid-configuration
If that page is missing or returns an error, the provider URL is wrong for the authorization server that holds your claims.
In the discovery JSON, check scopes_supported. For Okta it often looks like:
"scopes_supported": [
  "openid",
  "profile",
  "email",
  "groups"
]
What scopes and claims does the Controller expect?
By default the Controller looks for the openid, profile, and groups scopes, and requires these claims:
name(fromprofile)groups
Override the claim names with:
ANKA_OIDC_USERNAME_CLAIM=name
ANKA_OIDC_GROUPS_CLAIM=groups
Override the requested scopes with ANKA_OIDC_SCOPES only when your provider needs a different list. See the Configuration Reference for all ANKA_OIDC_* options.
The groups claim must be an array of strings. Each string must match a Controller permission group name.
Does the redirect URI need to be reachable from the public internet?
No. The redirect URI does not need to be public. It must match the hostname or IP (and port) that users type in the browser when they open the Controller.
Examples:
https://controller.example.com/oidc/v1/callback
https://anka.controller:8090/oidc/v1/callback
http://anka.controller.local/oidc/v1/callback
Which OAuth / OIDC flow is supported?
Only Authorization Code (also called Code / Explicit Flow). Implicit Flow is not supported.
OIDC currently protects the Controller UI/Dashboard only. It is not used for API or CLI authentication.
Must OIDC settings be set on both Controller and Registry?
Yes. Set the OIDC environment variables on both services. After you enable authentication, Nodes lose their connection until you join them again with the new credential.
When should I enable ANKA_OIDC_USER_INFO?
Keep ANKA_OIDC_USER_INFO=false when name, email, and groups are already present in the ID token. That is the recommended Okta setup in this guide.
Enable UserInfo only when your identity provider returns the required claims from the UserInfo endpoint instead of the ID token. If the Controller cannot find groups, you may see:
failed translating claims to user: no Groups claim in groups
In that case, either add the groups claim to the ID token, or enable UserInfo and configure the provider so UserInfo returns groups.
Okta login succeeds, then the Controller returns me to the login page. Why?
Okta can return too many groups in the token. The Controller then fails to complete login and sends you back to the login page.
Limit the groups claim filter in Okta (for example ^anka-.*) so the token includes only the groups you need. See Add the groups claim.
A blank dashboard after a successful login is a different problem: the user authenticated, but no Controller permission group matched. See Login succeeds, but the dashboard is blank.
How long do Controller UI sessions last?
UI sessions last as long as the OIDC Access Token lifetime. Shorten that lifetime in your provider if you need shorter Controller sessions.
Can I use a provider other than Okta?
Yes. Most customers use providers such as Okta, CyberArk Idaptive, or similar OIDC servers. The Controller requirements stay the same:
- Authorization Code flow
- Redirect to
/oidc/v1/callback nameandgroupsclaims (or your custom claim names)- Matching Controller permission groups
Ask your identity team to map those requirements onto your company’s preferred tools.