MTLS / Certificate Authentication
This feature requires an Anka Enterprise (or higher) license.
- With the combined (controller + registry) native macOS package: You’ll edit the
/usr/local/bin/anka-controllerd, enable TLS/HTTPS (required), and then enable certificate authentication. - With the docker package: You’ll edit the
docker-compose.yml, enable TLS/HTTPS, and then enable certificate authentication. - With either the controller or registry standalone packages: You’ll edit the proper config files, enable TLS/HTTPS, and then enable certification authentication.
Requirements
- Root Token Authentication must be enabled.
- A Root CA certificate. For more information about CAs, see https://en.wikipedia.org/wiki/Certificate_authority. Usually provided by your organization or where you obtain your certificate signing. We will generate a self-signed one in this guide and refer to this as anka-ca-crt.pem and anka-ca-key.pem.
- Certificate[s] (signed with the Root CA) for the Anka Build Cloud Controller & Registry.
- Certificate[s] (signed with the Root CA) for your Anka Build Nodes so they can connect/authenticate with the Anka Build Cloud Controller & Registry.
AWS Network Load Balancers (NLB) do not support mutual TLS authentication (mTLS). For mTLS support, you need to create a TCP listener instead of a TLS listener. When configured this way, the load balancer will pass through the request as-is, allowing you to implement mTLS on the target, i.e. NGINX.
If bringing your own certs, make sure they are not password protected (“encrypted”) (use openssl rsa -in <encrypted_private.key> -out <decrypted_private.key> to decrypt).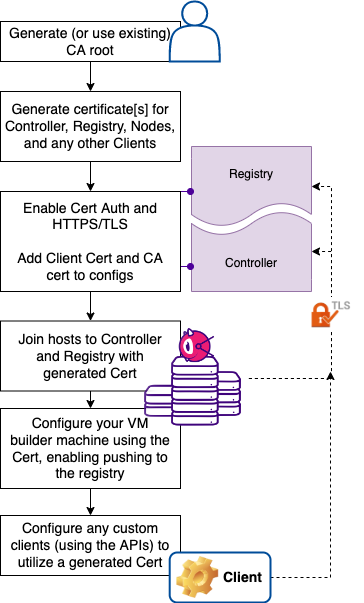
1. Create a self-signed Root CA certificate
If you don’t have a Root CA yet, you can create it with openssl:
cd ~
openssl req -new -nodes -x509 -days 365 -keyout anka-ca-key.pem -out anka-ca-crt.pem \
  -subj "/O=MyGroup/OU=MyOrgUnit/CN=MyUser"
You can add the Root CA to the System keychain so the Root CA is trusted and you can avoid warnings when you go to access the Controller UI.
sudo security add-trusted-cert -d -r trustRoot -k /Library/Keychains/System.keychain anka-ca-crt.pem
2. Configuring TLS for Controller & Registry
- TLS/HTTPS is required for Certificate Authentication.
- Your HTTPS/TLS cert can be from any root CA and does not need to be from the same CA as your authentication certs.
Create a self-signed cert for the services (optional)
If you don’t have a Root CA yet, you can create it with openssl:
cd ~
openssl req -new -nodes -x509 -days 365 -keyout anka-ca-key.pem -out anka-ca-crt.pem \
  -subj "/O=MyGroup/OU=MyOrgUnit/CN=MyUser"
You can add the Root CA to the System keychain so the Root CA is trusted and you can avoid warnings when you go to access the Controller UI.
sudo security add-trusted-cert -d -r trustRoot -k /Library/Keychains/System.keychain anka-ca-crt.pem
Certificates should be in PEM (PKCS #8) format.Ensure your certs are decrypted! They cannot have passwords.
For this guide, we’re running the Controller & Registry locally, so we use 127.0.0.1. If you’re running the registry on a different IP, and especially in your certs only allow specific IPs, you’ll need to set ANKA_REGISTRY_LISTEN_ADDRESS to theIP:PORTvs the default:PORT.
If you do not have TLS certificates for your Controller & Registry from a signed source, you can create them using your own CA:
export CONTROLLER_ADDRESS="127.0.0.1"
export REGISTRY_ADDRESS=$CONTROLLER_ADDRESS
openssl genrsa -traditional -out anka-controller-key.pem 4096
openssl req -new -nodes -sha256 -key anka-controller-key.pem -out anka-controller-csr.pem -subj "/O=MyGroup/OU=MyOrgUnit/CN=MyUser" \
  -reqexts SAN -extensions SAN \
  -config <(cat /etc/ssl/openssl.cnf <(printf "[SAN]\nextendedKeyUsage = serverAuth\nsubjectAltName=IP:$CONTROLLER_ADDRESS"))
openssl x509 -req -days 365 -sha256 -in anka-controller-csr.pem -CA anka-ca-crt.pem -CAkey anka-ca-key.pem -CAcreateserial \
  -out anka-controller-crt.pem -extfile <(echo subjectAltName = IP:$CONTROLLER_ADDRESS)
You can use the same certificate for both the Controller and Registry.
Beginning in Controller version 1.12.0, you can control the allowed TLS Cipher Suites and minimum/maximum TLS versions.
Configure the services to use the TLS cert
MacOS combined Controller & Registry package
Edit /usr/local/bin/anka-controllerd:
- Change the listen address to
443:export ANKA_LISTEN_ADDR=":443"
SSL will actually work on any port you want.
Add the following ENVs to enable HTTPS:
# SSL + Cert Auth
export ANKA_USE_HTTPS="true"
export ANKA_SERVER_CERT="/Users/MyUser/anka-controller-crt.pem"
export ANKA_SERVER_KEY="/Users/MyUser/anka-controller-key.pem"
Ensure
httpsis in the registry URL:export ANKA_ANKA_REGISTRY="https://anka.registry:8089"
The Controller & Registry runs as root. This is why you need to specify the absolute path to the location where you generated or are storing your certs.
Linux/Docker Controller & Registry package
Within the docker-compose.yml:
- Change the anka-controller ports from
80:80to443:80. You can keep the anka-registry ports the same (default: 8089). - Under the anka-controller, modify or set ANKA_ANKA_REGISTRY to use
https://. - Ensure there is a
volumesitem that points the local cert location inside of the container at/mnt/cert.
Now let’s configure the Controller & Registry containers/services to use those certificates:
version: '2'
services:
  anka-controller:
    container_name: anka-controller
    build:
      context: controller
    ports:
      - "443:80"
    depends_on:
      - etcd
      - anka-registry
    restart: always
    volumes:
      - "/opt/secure/certs:/mnt/certs"
    environment:
      ANKA_ANKA_REGISTRY: "https://anka.registry:8089"
      ANKA_USE_HTTPS: "true"
      ANKA_SKIP_TLS_VERIFICATION: "true" # Only needed if registry cert is self-signed
      ANKA_SERVER_CERT: "/mnt/certs/anka-controller-crt.pem"
      ANKA_SERVER_KEY: "/mnt/certs/anka-controller-key.pem"
  anka-registry:
    container_name: anka-registry
    build:
      context: registry
    ports:
      - "8089:8089"
    restart: always
    volumes:
      - "/opt/anka-storage:/mnt/vol"
      - "/opt/secure/certs:/mnt/certs"
    environment:
      ANKA_USE_HTTPS: "true"
      ANKA_SERVER_CERT: "/mnt/certs/anka-controller-crt.pem"
      ANKA_SERVER_KEY: "/mnt/certs/anka-controller-key.pem"
For the standalone package (separate docker containers for the controller and registry): If the SERVER_CERT and KEY is self-signed, you will need to setANKA_SKIP_TLS_VERIFICATIONtotruein the controller config so it can connect to the registry.
Test the Configuration
Start or restart your Controller and/or Registry and test the new TLS configuration using https://. You can also try using curl -v https://$CONTROLLER_OR_REGISTRY_URL/api/v1/status.
If that doesn’t work, try to repeat the above steps and validate that the file names and paths are correct. If you are still having trouble, debug the system as explained in the Debugging Controller section.
Answers to Frequently Asked Questions
- Load balancers must also have both the root CA and intermediate certificates in order to function properly.
3. Creating self-signed Node Certificates
The Controller’s authentication module uses the Root CA (anka-ca-crt.pem) to authenticate any incoming requests. When the Node sends the requests to the Controller, it will present its certificates. Those certificates must have been generated from the Root CA and also, if using Enterprise Plus, have the necessary permissions.
You can use the following openssl commands to create Node certificates using the Root CA:
NODE_NAME="$(hostname)"
ORG_UNIT="TEAM_ONE"
ORGANIZATION="MYORG"
openssl genrsa -traditional -out node-$NODE_NAME-key.pem 4096
openssl req -new -sha256 -key node-$NODE_NAME-key.pem -out node-$NODE_NAME-csr.pem \
  -subj "/O=$ORGANIZATION/OU=$ORG_UNIT/CN=$NODE_NAME"
openssl x509 -req -days 365 -sha256 -in node-$NODE_NAME-csr.pem -CA anka-ca-crt.pem -CAkey anka-ca-key.pem \
  -CAcreateserial -out node-$NODE_NAME-crt.pem
4. Configuring the Controller & Registry to enable authentication
In addition to the node certificates, the controller itself makes API calls to the Registry (you’ve enabled registry auth, right?) to get templates, etc, and will need a client cert to communicate with it. This is where ANKA_CA_CERT comes in as it’s used to validate the incoming requests.
NAME="anka-controller"
ORG_UNIT="TEAM_ONE"
ORGANIZATION="MYORG"
openssl genrsa -traditional -out $NAME-key.pem 4096
openssl req -new -sha256 -key $NAME-key.pem -out $NAME-csr.pem \
  -subj "/O=$ORGANIZATION/OU=$ORG_UNIT/CN=$NODE_NAME"
openssl x509 -req -days 365 -sha256 -in $NAME-csr.pem -CA anka-ca-crt.pem -CAkey anka-ca-key.pem \
  -CAcreateserial -out $NAME-crt.pem
MacOS combined Controller & Registry package
Edit the /usr/local/bin/anka-controllerd and ensure the following ENVs exist:
export ANKA_ENABLE_AUTH="true"
export ANKA_CA_CERT="/Users/MyUser/anka-ca-crt.pem"
export ANKA_CLIENT_CERT="/Users/MyUser/anka-controller-crt.pem"
export ANKA_CLIENT_CERT_KEY="/Users/MyUser/anka-controller-key.pem"
Linux/Docker Controller & Registry package
Within the docker-compose.yml, add the following ENVs:
version: '2'
services:
  anka-controller:
    container_name: anka-controller
    . . .
    environment:
      . . .
      ANKA_ENABLE_AUTH: "true"
      ANKA_CA_CERT: "/mnt/certs/anka-ca-crt.pem"
      ANKA_CLIENT_CERT: "/mnt/certs/anka-controller-crt.pem"
      ANKA_CLIENT_CERT_KEY: "/mnt/certs/anka-controller-key.pem"
  anka-registry:
    container_name: anka-registry
    . . .
    environment:
      . . .
      ANKA_ENABLE_AUTH: "true"
      ANKA_CA_CERT: "/mnt/certs/anka-ca-crt.pem"
TheANKA_CA_CERTis the authority that is used to validate the Anka Node Agent (ankacluster join) certs.
Until you have an Enterprise licensed Node joined to the Controller, it won’t enable authentication for the Controller.
If you’re connecting the Anka CLI with the HTTPS Registry URL, you can use the Node certificates:anka registry --cert /Users/$USER_WHERE_CERTS_ARE/node-$NODE_NAME-crt.pem --key /Users/$USER_WHERE_CERTS_ARE/node-$NODE_NAME-key.pem add $REGISTRY_NAME https://$REGISTRY_ADDRESS:8089(--cacertmay also be needed if you’re using a self-signed HTTPS cert and it’s not in your keychain)
Joining and Testing your Node and Controller Auth
First, copy both the Node certificates (node-$NODE_NAME-crt.pem, node-$NODE_NAME-key.pem) and the anka-ca-crt.pem to the host/node you wish to join.
If you previously joined your Nodes to the Controller, you’ll want tosudo ankacluster disjoinon each before proceeding (if it hangs, useps aux | grep anka_agent | awk '{print $2}' | xargs kill -9and try disjoin again).
Note: Certificates are cached, so if you update/renew them, you need to either:
- disjoin and re-join them to the controller, issue
sudo pkill -9 anka_agenton each node to restart the agent- or, issue a
<controller>/v1/node/updatePUT to the controller API to forcefully update all nodes.
If you’re using a signed certificate for the controller dashboard, but self-signed certificates for your nodes and CI tools, you’ll need to specify the--cacertforankacluster joinandanka registry addcommands and point it to the signed CA certificate. You’ll usually seeSSLError: ("bad handshake: Error([('SSL routines', 'tls_process_server_certificate', 'certificate verify failed')],)",)if the wrong CA is being used.
Then, use the ankacluster command to connect it to the Controller with:
sudo ankacluster join https://$CONTROLLER_ADDRESS --skip-tls-verification \
  --cert /Users/$USER_WHERE_CERTS_ARE/node-$NODE_NAME-crt.pem --cert-key /Users/$USER_WHERE_CERTS_ARE/node-$NODE_NAME-key.pem --cacert /Users/nathanpierce/anka-ca-crt.pem
Testing connection to Controller...: OK
Testing connection to registry….: OK
Ok
Cluster join success
The--skip-tls-verificationis only necessary if using a self-signed cert. Please avoid using--skip-tls-verificationAND the--cacert.
Testing
Restart your Controller & Registry and then test the status endpoint with curl:
curl --insecure -v https://$HOST/api/v1/status
The response you should get is a 401 Authentication Required similar to below:
> GET /api/v1/status HTTP/2
> Host: localhost:80
> User-Agent: curl/7.58.0
> Accept: */*
>
* Connection state changed (MAX_CONCURRENT_STREAMS updated)!
< HTTP/2 401
< content-type: application/json
< content-length: 54
< date: Thu, 28 Nov 2019 16:58:23 GMT
<
{"status":"FAIL","message":"Authentication Required"}
If this is the response you get, it means the authentication module is working.
Let’s try to get a response using the Node certificate we created. Execute the same command, but now pass Node certificate and key:
curl --insecure -v https://$CONTROLLER_ADDRESS/api/v1/status --cert /Users/$USER_WHERE_CERTS_ARE/node-$NODE_NAME-crt.pem --key /Users/$USER_WHERE_CERTS_ARE/node-$NODE_NAME-key.pem
If everything is configured correctly, you should see something like this (I used 127.0.0.1 to setup this example):
*   Trying 127.0.0.1...

. . .

> GET /api/v1/status HTTP/2
> Host: 127.0.0.1:80
> User-Agent: curl/7.64.1
> Accept: */*
>
* Connection state changed (MAX_CONCURRENT_STREAMS == 250)!
< HTTP/2 200
< cache-control: no-store
< content-type: application/json
< content-length: 184
< date: Sun, 12 Apr 2020 04:26:13 GMT
<
{"status":"OK","message":"","body":{"status":"Running","version":"1.7.0-4e6617d3","registry_address":"https://127.0.0.1:8089","registry_status":"Running","license":"enterprise plus"}}
* Connection #0 to host 127.0.0.1 left intact
* Closing connection 0
6. Configuring your Builder Node to push to the Registry
Typically you want to assign a specific Anka Node as a “builder node”. This node will run a licensed Anka installation and allow you to create and prepare VMs to be pushed to the Anka Build Cloud Registry as templates/tags. With Certificate Authentication enabled, you won’t be able to do this unless you specify the certs on the anka registry command:
> anka registry --help
usage: registry [options] <command>

   Configure and control template registries

options:
  -r,--remote <val>        Sets an alternate registry (name or URL)
  --insecure               Skip TLS verification
  --cert <val>             Path to a client certificate (if user authentication is configured)
  --key <val>              Path to private key if the client certificate doesn't contain one
  --cacert <val>           Use custom CA certificates location (default is /etc/ssl/certs)
  --api-key-id <val>       UAK/TAP identity
  --api-key <val>          UAK/TAP key in PEM format (path or string)
  -o,--oci-version <val>   OCI Distribution API version
  -u,--user <val>          User name and password
  -p,--prefix <val>        Append prefix to VM name for OCI registry
  --default                Show the default registry name
  --list                   List registries configured

commands:
  add                      Add a registry
  set                      Set default registry
  remove                   Remove a registry from the configuration
  list                     List templates in registry (see anka-push/pull commands)
  show                     Show a template's properties
  push                     Push a VM to the registry
  pull                     Pull a VM template from the registry
  revert                   Delete a template or tag
You can also use anka registry add to add it to the default configuration and not need to pass these in as options each execution:
> anka registry add --help
usage: add [options] name url

   Add a registry

arguments:
  name                     Registry name
  url                      Registry URL

options:
  -f,--force               Do not perform a connectivity checks for the url
Accessing the Controller UI
Once Cert Auth as been enabled, loading your Controller UI will show Controller Not Connected. This is because the Controller is fully protected. In order to access the UI, you can set up your browser to use client certificates to access the page. Alternatively, you can enable root token auth with ANKA_ROOT_TOKEN which must be set to a minimum of 10 characters. You can read more about it here.
Certificate Revocation
Starting in 1.32.0, users can now revoke certificates without needing to change the CA or permissions.
Generating the Certificate Revocation List
- Locally on your machine you’ll create
openssl.cnf(anywhere on your machine), containing various definitions:
[ ca ]
default_ca = CA_default                 # The name of the CA configuration to be used.
                                        # can be anything that makes sense to you.
[ CA_default ]
dir = .                                 # Directory where everything is kept
certs = $dir                            # Directory where the issued certs are kept
crl_dir = $dir                          # Directory where the issued crl are kept
database = $dir/index.txt               # database index file.
#unique_subject = no                    # Set to 'no' to allow creation of
                                        # several certificates with same subject.
new_certs_dir = $dir                    # Default directory for new certs.

certificate = $dir/anka-ca-crt.pem           # The CA certificate
serial = $dir/serial                    # The current serial number
crlnumber = $dir/crlnumber              # The current crl number
                                        # must be commented out to leave a V1 CRL
crl = $dir/crl.pem                      # The current CRL
private_key = $dir/anka-ca-key.pem           # The private key
RANDFILE    = $dir/.rand                # private random number file

x509_extensions = usr_cert              # The extentions to add to the cert

name_opt = ca_default                   # Subject Name options
cert_opt = ca_default                   # Certificate field options

default_days    = 365                   # how long to certify for
default_crl_days= 30                    # how long before next CRL
default_md    = sha1                    # use public key default MD
preserve    = no                        # keep passed DN ordering

policy = policy_match
- Next, create
index.txtandcrlnumberand store them in a centralized location:
Any revocations must happen against the latestindex.txtandcrlnumber(openssl.cnfis optional). It’s best to store these in a repo or somewhere that admins revoking can pull the latest versions and then commit them once complete.
touch index.txt         # stores revoked certificates database
echo "01" > crlnumber   # needs to be only initialized once
- Generate your first Certificate Revocation List (a.k.a “CRL”):
openssl ca -gencrl \
  -config openssl.cnf \
  -keyfile anka-ca-key.pem \
  -cert anka-ca-crt.pem \
  -out crl.pem \
  -crldays 365
- If Certificate Authentication is enabled for both the Controller and Registry, you’ll need to set
ANKA_CRLin both configs to the Revocation List File (.pem). If using Docker, you’ll need to attach a mount/volume that contains this file and target the destination/location inside of the container. - Generate your client certificates with
opensslas you normally would, using the same root CA you used to generate the CRL.
Revoking a certificate
- When you need to revoke a certificate, you can use the following to add the cert to the
index.txtdatabase file:
openssl ca -config openssl.cnf \
  -revoke node-Veertu.local-crt.pem \
  -keyfile anka-ca-key.pem \
  -cert anka-ca-crt.pem
- Once revoked, you must re-generate the CRL file and update it on the Controller and Registry, restarting them once updated:
openssl ca -gencrl \
  -config openssl.cnf \
  -keyfile anka-ca-key.pem \
  -cert anka-ca-crt.pem \
  -out crl.pem \
  -crldays 365
Some things to note
- You can check if a certificate is revoked with
openssl verify -crl_check -CAfile anka-ca-crt.pem -CRLfile crl.pem node-Veertu.local-crt.pem. - The
index.txt,crlnumber, and certs generated should be stored in a centralized location. We recommend a repo or a server with openssl on it that only admins have access to. Any changes made should be checked into the repo so that others can pull them and start from the latest version of the revocation DB (index.txt). - If the
crl.pemexpires, the controller and registry will fail. - The
crl.pemmust be generated with CA Root cert that the Controller and Registry are using.
Managing User/Group Permissions (Authorization)
When creating certificates, you’ll want to specify CSR values using openssl’s -subj option. For example, if we’re going to generate a certificate so our Jenkins instance can access the Controller & Registry, you’ll want to use something like this:
-subj "/O=MyOrgName/OU=$ORG_UNIT/CN=Jenkins"
- At least one
O=ANDCN=is required. - You can specify multiple
O=like so:/O=DevOps/O=iOSDEV/ . . . - Within the Controller’s Permission administration panel, we use
O=as the Group Name. - Spaces are supported in
O=and Anka Build Cloud Controller version >= 1.10.
Authorization allows you to control access to specific actions/endpoints of the API and even specific Resources like Nodes and Templates in your Controller and Registry. It has four parts to it that are important to understand:
- Component (Controller or Registry)
- Groups
- Permissions
- Resources
- Permissions
- Groups
Groups are the wrappers for all Permissions and Resources. You attach a Groups to a Authentication credential to enable certain access.
- Group Permissions are given to allow a credential access to perform a specific action, like listing or creating a VM Instances. Because these control general access to the API to make calls, it overrides any Resource Permissions.
Resources limit which Nodes and Templates the credential can control.
- Resource Permissions are given to a Resource, further limiting the Group’s access per Resource. As an example, these Resource Permissions allow an admin to prevent a specific Group from deleting a Node from the cloud, yet allow changes to its config, and more. It’s critical to understand that if the Groups Permission “Instances > Start” is not checked, the Resource Permissions for the Group allowing Create Instance won’t matter as the credential has no access to make a Start VM API call.
- Resource Management, which enables Resource control, is optional. If disabled, all Resources (and Resource Permissions) are available to all credentials.
After a Group is created, you’ll assign it to a specific credential. The credential can have one or more Groups attached and it’s important you consider how much access for each Group you need to provide for your use-case and security requirements.
In this guide we will start with the most common use-case of sharing Node between multiple teams (Groups), then explain how to isolate Nodes per team (similar to how the older Node Groups worked) later on.
Prerequisites
To enable Authorization features, you’ll need to ensure:
Authentication is enabled by setting
ANKA_ENABLE_AUTHandANKA_ROOT_TOKENENVs in your Controller & Registry config. You’re also familiar with one of the existing Authentication methods and have one set up.Groups + Group Permissions are enabled by enabling Authorization. The following ENVs can be added to your config to achieve this:
ANKA_ENABLE_CONTROLLER_AUTHORIZATION(boolean) works for both macOS and docker controller packages.ANKA_ENABLE_REGISTRY_AUTHORIZATION(boolean) works for the macOS registry package only.ANKA_ENABLE_AUTHORIZATION(boolean) is only for the registry.
This should expose the
https://<controller address>/#/permission-groupspage in your Controller.Resource Permissions are enabled by setting
ANKA_ENABLE_RESOURCE_MANAGEMENTtotruein your configuration.
License Considerations: These features are only available for Enterprise tier licenses.
- Enterprise license customers cannot control authorization and each authentication credential will have full access to the system.
- However, Enterprise Plus customers will be able to use Permission Groups and Resources to have more fine-grained control over access.
Groups + Group Permissions
Do not confuse Node Groups with Groups/Group Permissions.
Under the Permissions section of the Controller UI (https://<controller address>/#/permission-groups), let’s create a group for our nodes to be able to connect.
- First choose the Controller Component from the drop down.

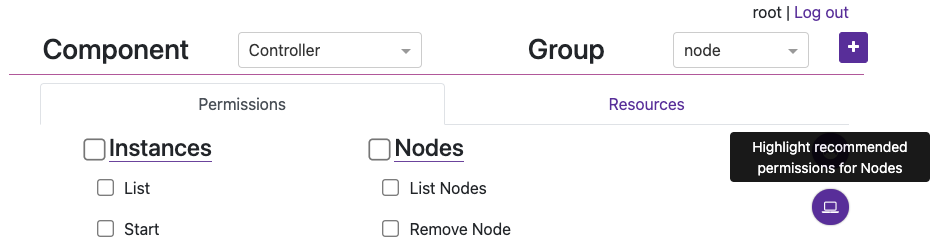
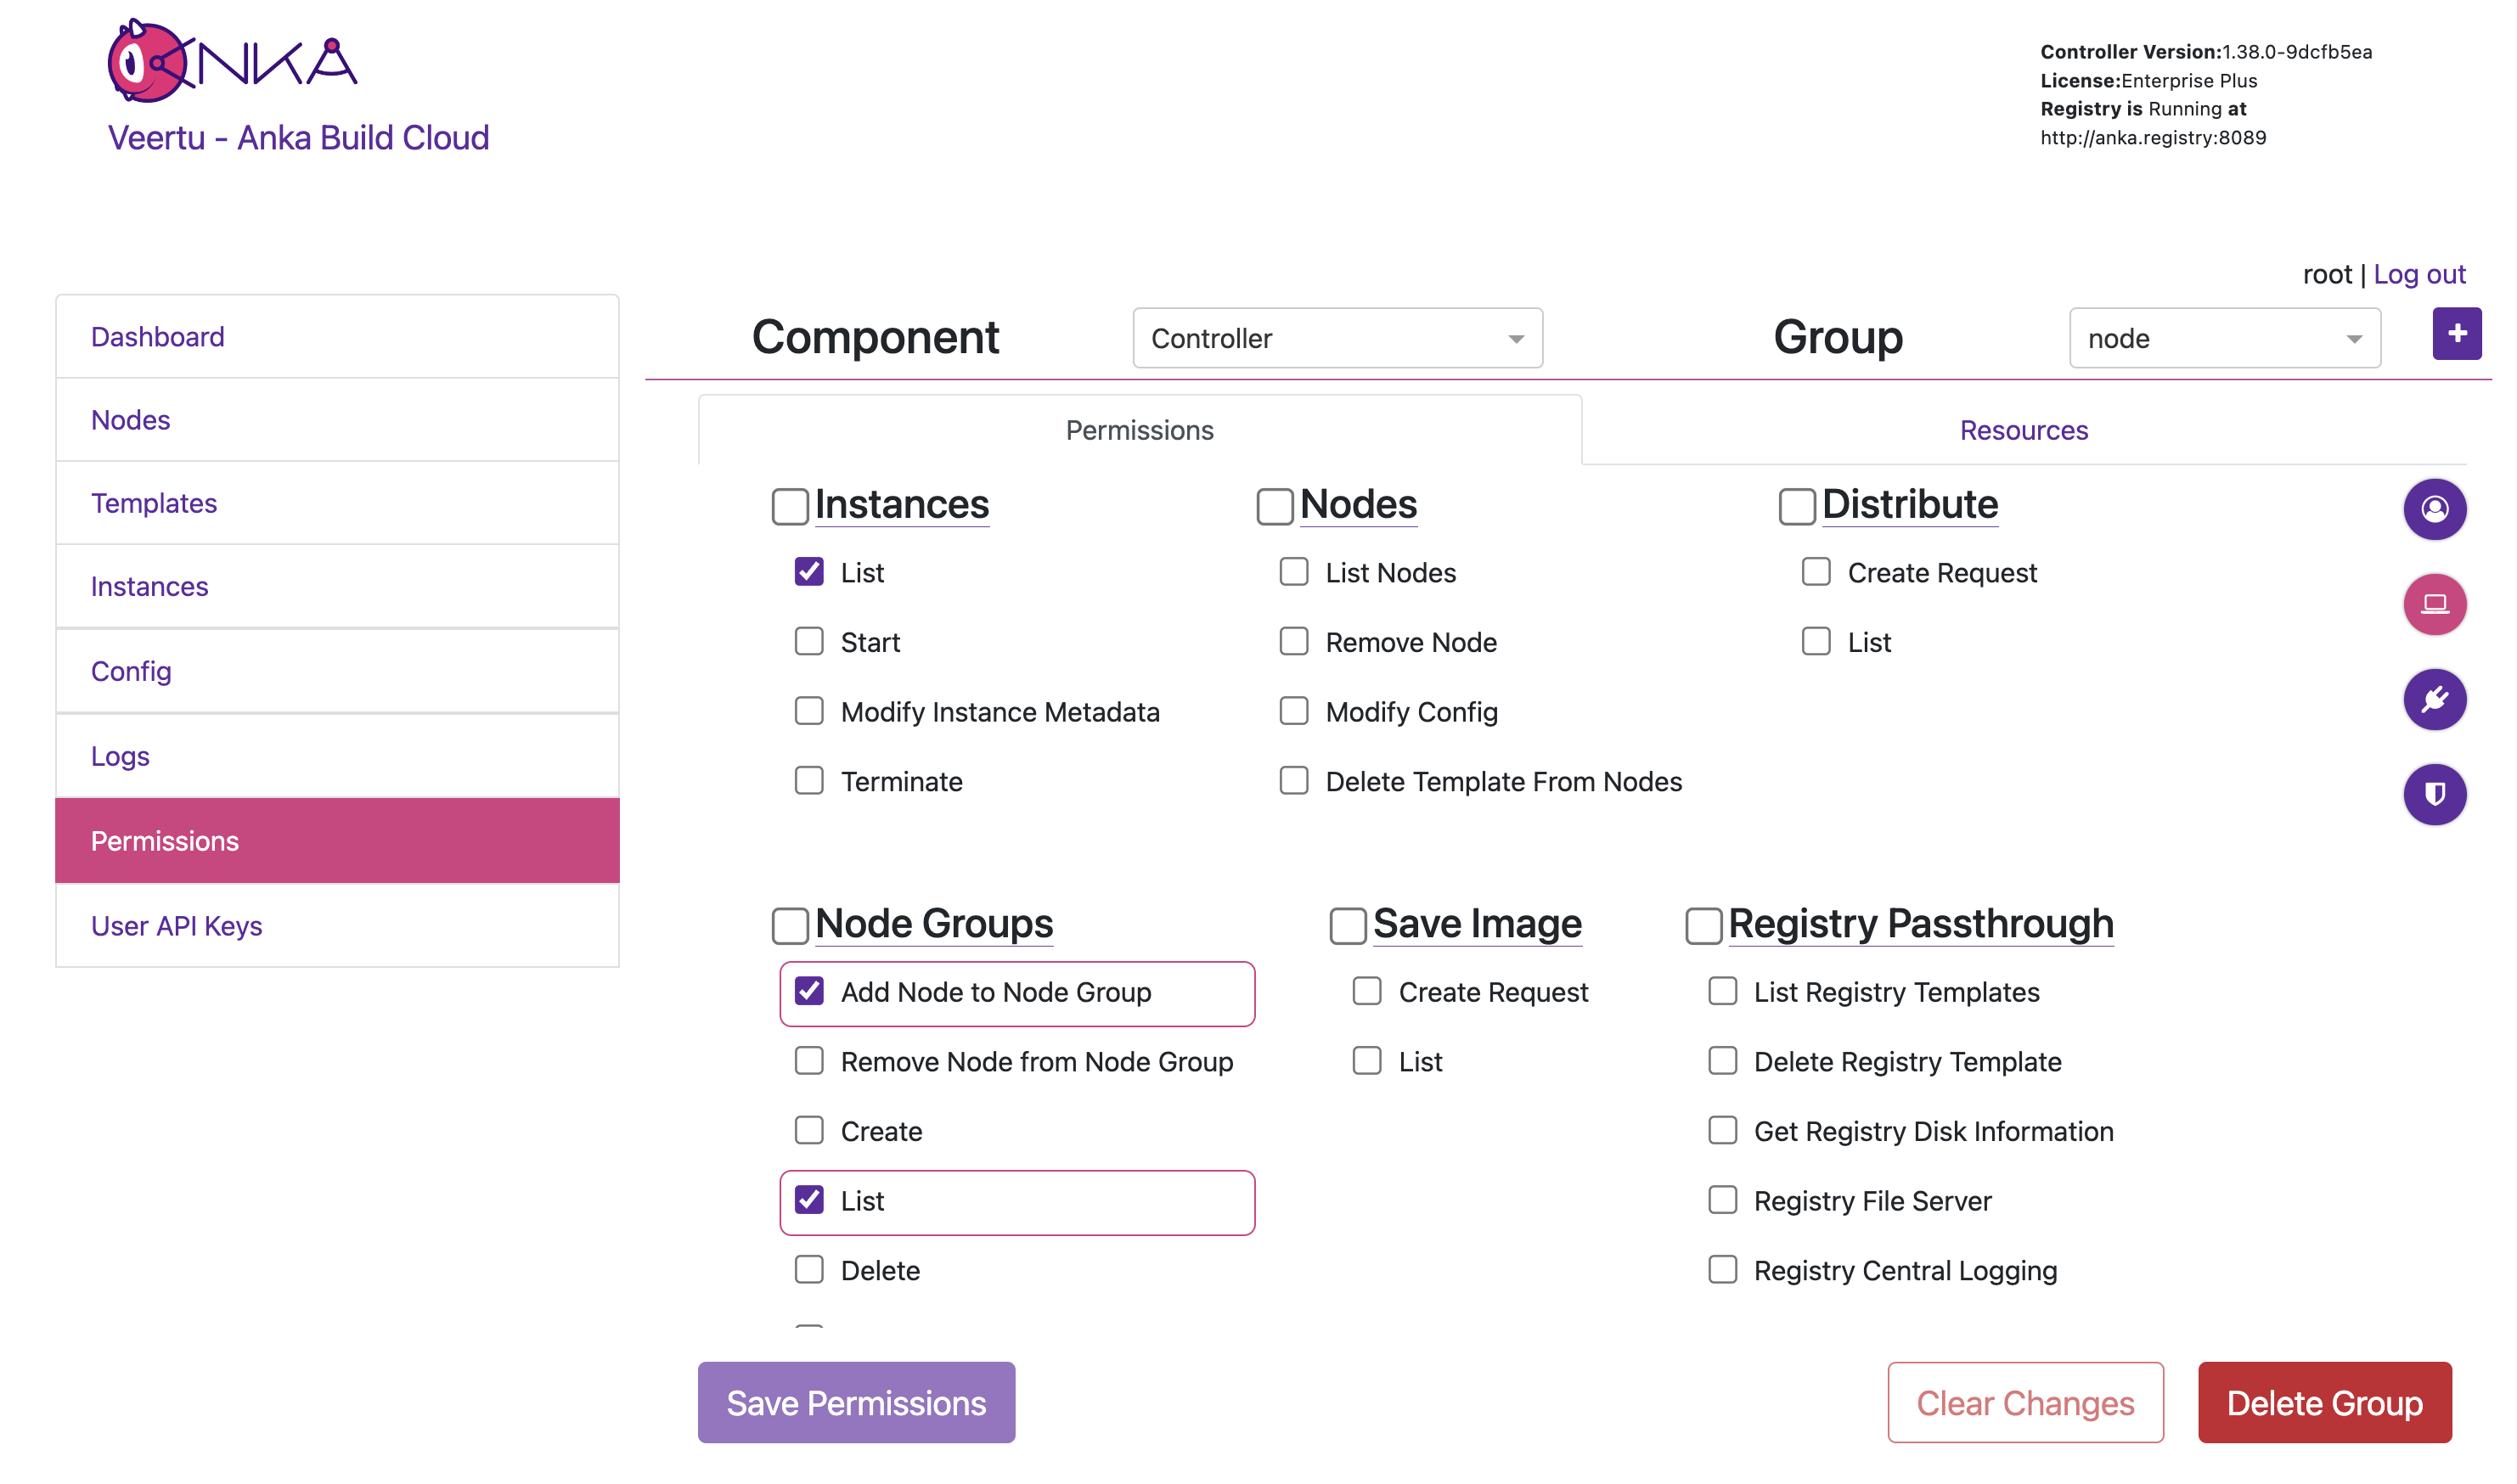
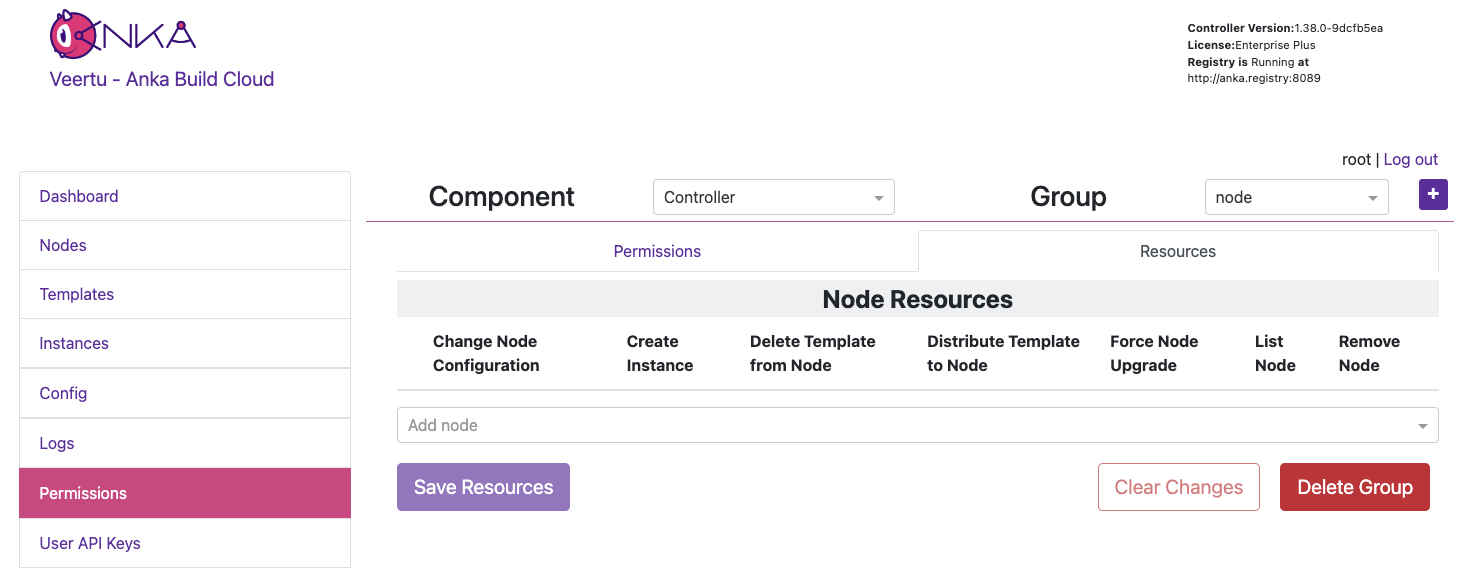
Next, create a new group named
nodeby clicking the [+] button.You can now target and add specific Permissions or Resources for the Group. Click the circular (💻) icon on the right to highlight what permission should be set for Nodes to communicate with the Controller. Then check/enable the highlighted permissions and click Save Permissions at the bottom of the page. Important: Finally, do the same but under the Registry Component.
Note: We’ll not be setting Resources right now.
- The group can now be attached to a specific Authentication Credential and the credential used to access and perform the permitted actions. For example, create a UAK and attach the group.
Be sure to download the key if you’re creating a new UAK.
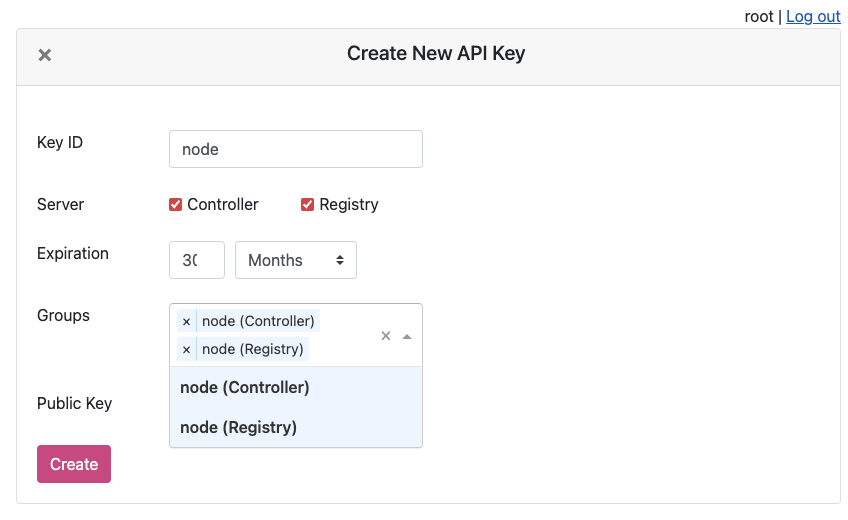
You will now see the UAK in the list.

The node certificate now has permissions to perform the specifically set actions against all Resources (if Resource Management is disabled).
- You can now try joining the node to the Controller using the UAK and confirm it’s all joined by checking the Controller Nodes page, or the agent logs.
❯ sudo ankacluster join http://anka.controller:8090 --api-key-file ~/node.cer --api-key-id "node"
Testing connection to the controller...: Ok
Testing connection to the registry...: Ok
Success!
Anka Cloud Cluster join success
Resources + Resource Permissions
Node Groups are disabled while Resource Management is enabled.
The Resource Management/Permissions feature is enabled by setting ANKA_ENABLE_RESOURCE_MANAGEMENT to true in your configuration. Once enabled, it unlocks the Resources tab under /permission-groups.
Within the Resources tab you will be able to, depending on the Component selected, add specific Nodes or Template Resources to the Group. This limits the Group to certain actions that can be performed against those Resources.
An example of this is allowing the iOS team/group to distribute specific Templates to specific Nodes, but not create VM Instances or delete the Node.
In the previous section on Group Permissions, we joined a Node using a credential with the Group node attached. This Group only has Permissions to perform the minimum required actions to run as an Anka Node and communicate with the Controller. We did not add Resources to it though (even though we technically could) so we can instead have team specific Groups and credentials.
In this example, each team gets only their Node or Template Resources assigned to their Group, with no ability to make API calls to Components/Permissions. Instead, other non-team Groups handle the ability to call certain endpoints and perform certain actions to the Controller and Registry. Individual groups (team and non-team related) are then assigned to certain credential, combining the Permissions and Resources.
It’s important to understand that a single credential, like a UAK or a Certificate, should only ever be used by a single user or client. You wouldn’t ever want to share the Node credential with a team for example. Create a second credential for that team, then in order for the Node to be able to access the team’s credential, add the team’s Group to the Node credential.
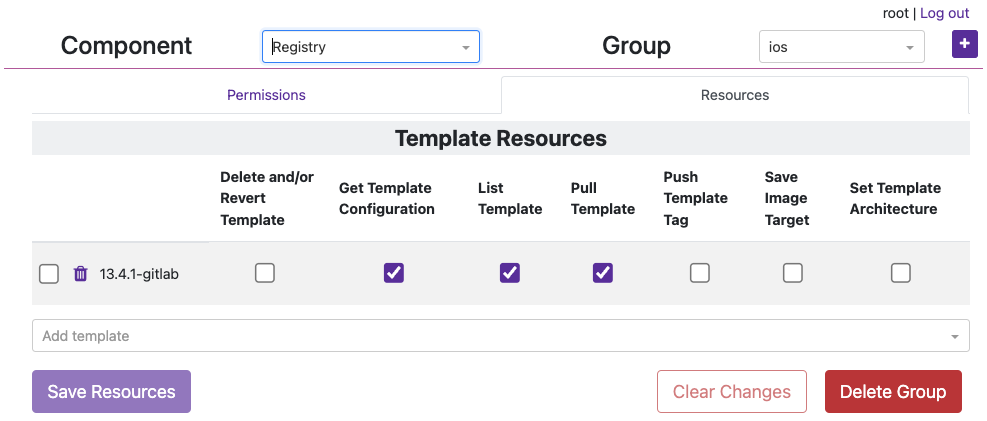
Create two groups:
iosandinstance-control.Under the
iosGroup > Resources, add the Template Resource you want this team to access. The bare minimum permissions are seen in the image below.
- Under the
instance-controlGroup > Permissions, add all of the Instances Permissions like in the image below.

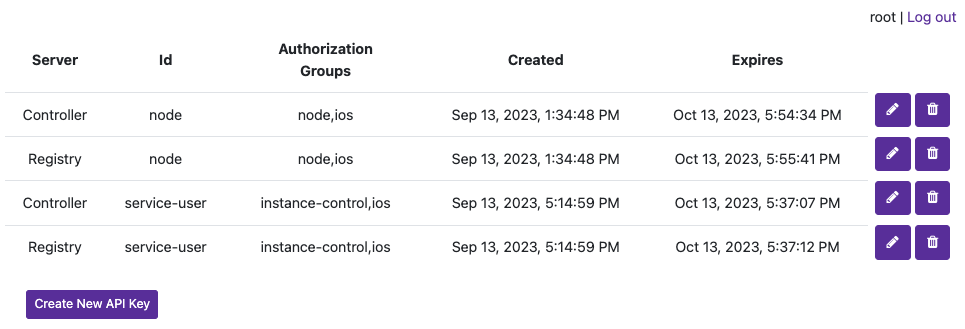
Now create a new credential (not Group) named
service-userand attach those two groups. We’ll use UAKs for this example. There is no need for theservice-userto have its own group as it will get the VM start and terminate permissions frominstance-controlgroup and Template/Node permissions from theiosgroup.Attach the group
iosto thenodecredential we created in the previous section and joined our node with so that that it can also collect information about the Template in order to start the VM Instance properly (it checks the download size of the template before pulling). Your UAK setup should look something like this image.
We can now use the service-user credential in your CI/CD tools to communicate with the Controller when an ios team member triggers a job. When the service-user credential makes an API call to start a VM Instance, it will pass in the ios group. That ios group has access to the template being targeted and is required.
Node Groups
The method described above works well for sharing the same nodes amongst all teams in an organization. But what if you want to isolate specific nodes to specific teams? Node Groups are disabled when Resource Management is enabled, but that should make sense to you by now as Node access/permissions are now bound to a specific Group + a specific credential. There are are several other scenarios possible which we’ll detail below.
You cannot have a shared Node credential and also limit by Node Resources for specific teams.
Scenario 1: Team Specific Anka Nodes
This configuration allows isolating certain Nodes to certain teams. The service-user credential is necessary to make API calls. In the Controller > Instances page or the API the team member can now start VM Instances with the group team1 (or 2, 3) and it will only start on the Nodes assigned to the team’s group. This is due to the Resource Permission for the Node being attached to the team group.
High Level Overview
- Three Anka Nodes joined to the Controller, each with separate credentials.
- Three Node credentials used to join:
- UAK: team1-nodes - Groups attached: node,team1
- UAK: team2-nodes - Groups attached: node,team2
- UAK: team3-nodes - Groups attached: node,team3
- Three “service user” credentials for teams to make API calls:
- UAK: team1-su | Groups attached: service-user,team1
- UAK: team2-su - Groups attached: service-user,team2
- UAK: team3-su - Groups attached: service-user,team3
- Group
nodehas- Permissions: Recommended Node permissions (see UI).
- Resources: None.
- Group
service_userhas- Permissions: Instances, Nodes, and Distribute.
- Resources: None.
- Group
team1/team2/team3has- Permissions: None.
- Resources: The specific Node (and other Resources) for the team.
Scenario 2: Shared Anka Nodes / Teams limited by VM Template Resource Permissions
This configuration allows all teams to share all Anka Node capacity, but only be able to start specific VMs from specific Templates Resources assigned to their team’s Permission Group.
High Level Overview
- Three Anka Nodes joined to the Controller, each with the same credential.
- Three Node credentials used to join:
- UAK: nodes - Groups attached: node,team1,team2,team3
- UAK: nodes - Groups attached: node,team1,team2,team3
- UAK: nodes - Groups attached: node,team1,team2,team3
- Three “service user” credentials for teams to make API calls:
- UAK: team1-su | Groups attached: service-user,team1
- UAK: team2-su - Groups attached: service-user,team2
- UAK: team3-su - Groups attached: service-user,team3
- Group
nodehas- Permissions: Recommended Node permissions (see UI).
- Resources: None.
- Group
service_userhas- Permissions: Instances, Nodes, and Distribute.
- Resources: None.
- Group
team1/team2/team3has- Permissions: None.
- Resources: The specific Template Resources for that team. No Nodes.
Scenario 3: Team Specific Anka Nodes + Dynamic Nodes
This configuration allows teams to have specific nodes guaranteed, then admins to increase capacity by assigning the specific team’s group to the nodes.
High Level Overview
- Four Anka Nodes joined to the Controller, each with separate credentials. Three get assign to specific teams, but the fourth can dynamically change to provide extra capacity to specific teams when needed.
- Four Node credentials used to join:
- UAK: team1-nodes - Groups attached: node,team1
- UAK: team2-nodes - Groups attached: node,team2
- UAK: team3-nodes - Groups attached: node,team3
- UAK: dynamic-nodes - Groups attached: node
- Dynamically update this UAK’s groups to add any team or teams that need the extra capacity
- Three “service user” credentials for teams to make API calls:
- UAK: team1-su | Groups attached: service-user,team1
- UAK: team2-su - Groups attached: service-user,team2
- UAK: team3-su - Groups attached: service-user,team3
- Group
nodehas- Permissions: Recommended Node permissions (see UI).
- Resources: None.
- Group
service_userhas- Permissions: Instances, Nodes, and Distribute.
- Resources: None.
- Group
team1/team2/team3has- Permissions: None.
- Resources: The specific Node (and other Resources) for the team.
Answers to Frequently Asked Questions
- The Nodes joined to the Controller must have Permissions to access the Template being used to start a VM. This mean at least one of the groups attached to a node credential must have the template resource attached.
- Node Groups differ from Permissions Groups and are disabled when this feature is enabled.
- Save Image requests can only target Instances that belong to a group the user has access to.
6. Final Notes
- The Controller and Registry must have the same Root Token in order to communicate with each other. It does not use any other form of authentication.
- You may notice that the Controller UI doesn’t load or acts strangely. You will need to enable Root Token Authentication to access the controller UI.
- If you get an invalid cert error from the Controller UI, make sure that you add the root CA you generated to your system keychain.
Kubernetes & NGINX Ingress Header Passthrough
Available in Controller >= 1.33.0
Customers who rely on NGINX Ingress controllers which terminate the HTTPS connection inside of the cluster will be able to now pass through TLS headers used for Controller & Registry communication with Certificate Auth.
- This feature requires
ANKA_ENABLE_AUTH: "true"andANKA_ENABLE_INGRESS_NGINX: "true"env vars or corresponding flags to be specified. When these flags are enabled controller/registry will checkSsl-Client-CertandSsl-Client-Verifyheaders (enabled bynginx.ingress.kubernetes.io/auth-tls-pass-certificate-to-upstream: true). For successful authentication,Ssl-Client-Verifyhas to be exactlySUCCESSandSsl-Client-Certhas to contain an url encoded pem certificate. - The ingress controller should be configured to perform SSL client authentication on its own – See here and here. Note that its required to have
nginx.ingress.kubernetes.io/auth-tls-pass-certificate-to-upstreamset totrue. This will enable passing of client certificate to the controller/registry. - This whole setup implies that ingress controller performs SSL termination of all traffic inside the cluster is regular unencrypted HTTP, controller/registry will not validate received certificate, it will trust it by default, because all traffic authentication/validation is performed by nginx.
Here is an example ingress config:
apiVersion: networking.k8s.io/v1
kind: Ingress
metadata:
  name: anka-controller-registry-ingress
  annotations:
     nginx.ingress.kubernetes.io/auth-tls-verify-client: "on"
     nginx.ingress.kubernetes.io/auth-tls-pass-certificate-to-upstream: "true"
     nginx.ingress.kubernetes.io/auth-tls-secret: "default/ca-secret"
     nginx.ingress.kubernetes.io/auth-tls-verify-depth: "1"
     nginx.ingress.kubernetes.io/auth-tls-error-page: "http://ingress-certificate-validation-failed.local"